
Basement Suite Design Ideas Vancouver: Layout, Light & Finishes That Attract Tenants (2026)
A basement suite in Vancouver can be one of the smartest investments a homeowner ever makes — or one of the most frustrating. The difference between a suite that sits vacant for months and one that rents within a week, retains tenants for years, and commands $2,400 per month instead of $1,600 comes down almost entirely to design. Not square footage. Not location. Design.
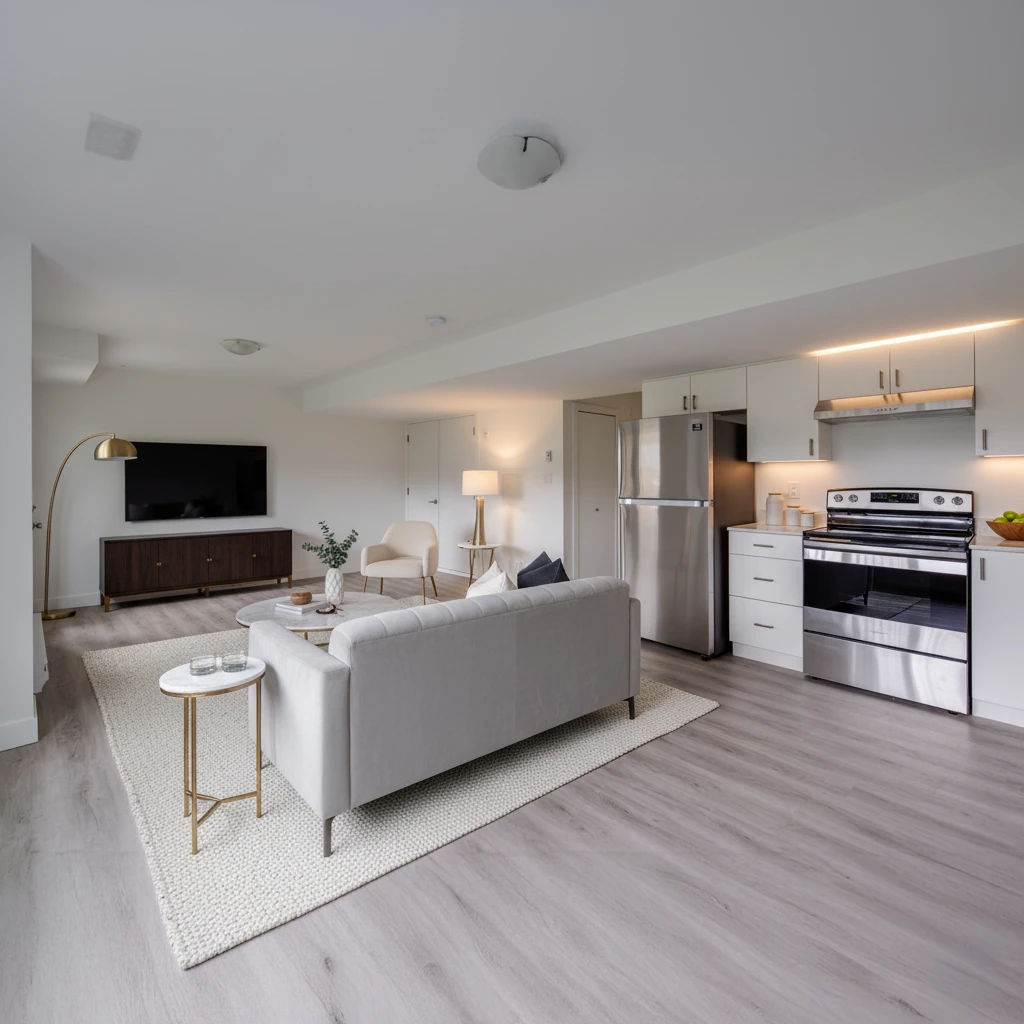
Vancouver renters have options. Thousands of basement suites compete for the same tenants, and today’s renter will walk away from a dark, low-ceilinged, poorly planned space — even if the price is lower. They have seen enough bright, thoughtfully designed suites to know what is possible below grade. When your suite looks and feels like an apartment rather than a converted storage room, you earn a premium and you keep tenants.
This guide covers every design decision that matters: layout fundamentals, solving the light problem, ceiling height strategies, kitchen and bathroom design, flooring, sound separation, mechanical systems, and the finishing standards that correspond to each rent tier. Whether you are planning a new legal suite or renovating an existing one, use this as your design brief before your first meeting with a contractor.
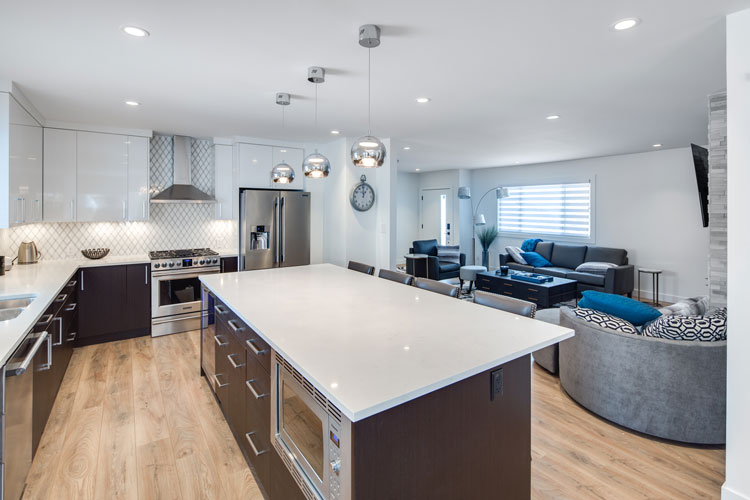
 Home addition renovation in Metro Vancouver” class=”wp-image-12760″ />
The Vancouver rental market is competitive, but not in the way most homeowners assume. Vacancy rates for well-designed suites in East Vancouver, Burnaby, and Coquitlam hover near zero
Vancouver General Contractors
If you are still in the planning phase, our renovation guide covers the permit process, budget planning, and how to choose a contractor. For project-specific advice, contact our team for a free consultation.
1. Why Basement Suite Design Matters More Than You Think
The Vancouver rental market is competitive, but not in the way most homeowners assume. Vacancy rates for well-designed suites in East Vancouver, Burnaby, and Coquitlam hover near zero. At the same time, dark, low suites with galley kitchens and carpet over concrete sit empty for eight to twelve weeks. The difference in monthly rent between these two types of suite is $600 to $800 — and the difference in construction cost is often $20,000 to $35,000. Do the math: $700 extra per month multiplied by 12 months is $8,400 per year. The upgrade pays back in under five years and then compounds indefinitely.
Tenant retention is the other half of the equation. A tenant who loves their suite renews their lease year after year. A tenant who tolerates their suite leaves at the first opportunity, triggering vacancy, advertising costs, re-cleaning, and often another round of repairs. High-quality design reduces turnover dramatically. A 2025 survey by the Tenant Resource and Advisory Centre found that natural light, sound separation from the principal dwelling, and kitchen quality were the top three factors tenants cited for renewing or leaving a basement suite.
Design also affects legal compliance. The City of Vancouver requires basement suites to meet specific standards for egress, ceiling height, room dimensions, and mechanical systems. Getting those requirements right during the design phase costs nothing. Getting them wrong — and having an inspector require modifications after framing is complete — can cost $15,000 to $40,000 in rework. Good design and code compliance are not in tension; they reinforce each other.
2. Layout Fundamentals: Choosing the Right Floor Plan for Your Footprint
Three suite layouts dominate the Vancouver market, and each suits a different basement footprint. Choosing the wrong layout for your space is the single most common design mistake homeowners make — and it is one of the most expensive to fix after construction.
Open Plan (Studio-Style with Separate Bedroom)
The open plan combines the living area, dining area, and kitchen into one continuous space, with a single bedroom separated by a wall or partial partition. This layout works best in footprints under 650 square feet because it makes the space feel larger than it is. The combined living/dining/kitchen area needs to be at least 200 square feet to function without feeling cramped. Open plans are popular with single tenants and couples who prioritize a feeling of spaciousness over privacy. They are the easiest to light effectively, since windows in the open living area illuminate the entire main space.
Split Plan (Bedrooms on Opposite Sides)
The split plan places bedrooms at opposite ends of the suite, with the kitchen, living area, and bathroom in the centre. This is the highest-value layout for families and roommate situations because it provides acoustic separation between sleeping areas. It requires a footprint of at least 800 square feet to work comfortably. Split plans command the highest rents per square foot in the Vancouver basement suite market because they accommodate more tenants without sacrificing livability. The challenge is that the centre zone — where the kitchen and bathroom usually sit — often has the least natural light, so artificial lighting strategy is critical.
Traditional Plan (Bedroom Corridor)
The traditional plan runs bedrooms along a corridor, with the living areas at the front or rear. It is common in older Vancouver homes where the basement was originally designed as utility space and the structural layout does not favour open planning. Traditional plans can work well when the corridor is kept short and the living areas are consolidated into a single large room rather than subdivided. Avoid traditional plans with long dark hallways — they are the fastest way to make a below-grade suite feel institutional and uninviting.
Minimum Room Dimensions Under BC Building Code
| Room | BC Building Code Minimum | Recommended for Tenant Appeal |
|---|---|---|
| Bedroom | 7.4 m² (80 sq ft) | 10–12 m² (108–129 sq ft) |
| Living room | 13.5 m² (145 sq ft) | 16–20 m² (172–215 sq ft) |
| Kitchen | No minimum area; appliances required | 7–10 m² with counter space |
| Bathroom (3-piece) | No area minimum; clearances apply | 4.5–6 m² for comfort |
| Hallway width | 860 mm (34 in) | 914 mm (36 in) minimum |
Private Entrance Placement
The City of Vancouver requires secondary suites to have a separate entrance from the principal dwelling. Three configurations are common: an exterior stairwell with a below-grade door at the front or side of the house (adds a covered stair structure, costs $8,000–$18,000); a side entry through an existing side door with a vestibule to separate the suite from the main floor (least expensive, works where an existing side door opens to the basement level); and a rear entry off the backyard or lane (popular in Vancouver where laneways are common). The entrance you choose affects privacy, weather protection, and the first impression tenants get of the suite. A covered entrance with good lighting and a proper threshold is worth the extra cost — it signals quality before the tenant steps inside.
3. Solving the Light Problem: The Most Common Complaint in Basement Suites
Ask any Vancouver renter what they dislike most about basement suites and the answer is almost always the same: it feels dark. Below-grade spaces receive little to no direct sunlight through standard windows, and the result — without deliberate design intervention — is a suite that feels dim, cold, and unwelcoming regardless of how well it is finished. Solving the light problem is the single highest-ROI design decision you can make.
Egress Windows
BC Building Code requires at least one egress window in each bedroom — a window large enough for occupants to escape in an emergency. The minimum opening is 0.35 m² with no dimension less than 380 mm. This is a code floor, not a design target. Upgrading to the maximum window size the opening allows — often 24 inches wide by 36 to 48 inches tall — dramatically changes how the suite feels. A single large egress window in a bedroom can provide enough natural light to make the room feel genuinely comfortable, not just technically habitable. The cost premium for a larger window over the code minimum is $300 to $800 per window — one of the best dollars you will spend in the entire project.
Window Wells with Reflective Liners
Window wells are the excavated areas outside below-grade windows that allow windows to sit below the exterior grade. Standard window wells are galvanized steel corrugated panels that hold back soil but do nothing to improve light. Upgrading to a window well with a white or reflective liner — polished aluminum or white-painted concrete — bounces additional daylight into the suite. Adding a clear polycarbonate cover over the well prevents it from filling with leaves and water while allowing light transmission. A properly configured window well with a reflective liner and cover can increase the perceived light level in the adjacent room by 30 to 40 percent compared to a standard well. Cost: $400 to $1,200 per window well, depending on excavation required.
Artificial Light Layering
No amount of natural light strategy eliminates the need for excellent artificial lighting in a basement suite. The layered lighting approach — ambient, task, and accent — is the same approach used in hotel rooms and high-end apartments, and it works for the same reason: it eliminates the flat, institutional feeling of a single overhead fixture. Ambient lighting provides overall illumination (recessed LED downlights on a dimmer, ideally at 3,000K colour temperature for warmth). Task lighting provides focused light where work happens (under-cabinet LED strips in the kitchen, a sconce beside the bathroom mirror, a reading light in the bedroom). Accent lighting draws attention to architectural features or adds warmth (LED strips above kitchen cabinets, a pendant over the dining table). Budget $3,000 to $6,000 for a well-layered lighting plan in a 700-square-foot suite.
| Light Solution | Cost Range | Light Impact | Best Use |
|---|---|---|---|
| Enlarged egress window | $800–$2,500 per window | High | Bedrooms (required) |
| Window well with reflective liner | $400–$1,200 per well | Medium-High | Below-grade windows |
| Sun tunnels (tubular skylight) | $800–$2,000 installed | Medium | Interior rooms with roof access |
| Glass block | $150–$400 per unit | Low-Medium | Privacy areas, stairwells |
| LED downlight array | $1,500–$3,500 | High (artificial) | All rooms |
| Under-cabinet LED strips | $300–$800 | Medium (task) | Kitchen |
4. Ceiling Height Strategies: Working With What You Have
BC Building Code sets the minimum ceiling height for habitable rooms in a suite at 1.95 metres (approximately 6 feet 5 inches). That is the legal floor. Most older Vancouver homes — particularly those built before 1980 — have basement ceilings between 6’2″ and 6’8″ after the floor structure is accounted for. The difference between a suite that feels comfortable and one that feels oppressive is often less than eight inches of ceiling height. How you handle that space is a design question, not just a structural one.
Drywall Directly to Joists
The most effective strategy for maximizing ceiling height is to install drywall directly to the underside of the floor joists, with no dropped ceiling or furring strips. This preserves every millimetre of available height. The tradeoff is that mechanical and electrical runs must be routed carefully — plumbing, HVAC ducts, and electrical conduit all need to fit within the joist bays or be planned to avoid high-traffic areas where height is most noticeable. A skilled designer plans mechanical routes before framing begins to ensure the ceiling remains flat and at maximum height throughout the suite. Dropped ceilings to hide mechanicals are sometimes unavoidable in specific zones (typically above the bathroom or where drain lines run), but should be confined to hallways or closets where height is less critical.
Recessed LED Fixtures
Standard surface-mounted light fixtures hang 6 to 12 inches below the ceiling — a significant penalty when ceiling height is already tight. Recessed LED pot lights sit flush with the drywall, adding no depth. In a suite with a 6’8″ ceiling, a recessed fixture is the difference between comfortable headroom and a constant awareness of the ceiling above you. Thin-profile LED wafer lights — designed for retrofit but equally effective in new construction — sit just 3/8 inch below the drywall surface and require no ceiling box, making them the preferred choice in low-ceiling suites.
Colour and Perception
White or off-white ceilings with flat paint reflect light upward and make ceilings appear higher. Light wall colours — pale grey, warm white, soft greige — in combination with white ceilings and light-coloured flooring create the maximum sense of height and brightness in a below-grade suite. Avoid dark wall colours in suites with low ceilings; they absorb light and create a closing-in effect that no amount of good lighting can fully overcome.
When Underpinning Makes Sense
If your basement ceiling is below the code minimum of 1.95 metres after accounting for the floor assembly, underpinning — the process of excavating below the existing foundation footings to lower the basement floor — is the only way to create a legal suite. Underpinning costs $40,000 to $100,000 depending on the home’s size, soil conditions, and the amount of excavation required. It adds significant value: a home in East Vancouver with a legal basement suite commands $150,000 to $250,000 more than the same home without one. If your ceiling height is borderline — say, 6’2″ — underpinning to 7’0″ is almost always worth the investment from a rental income and resale perspective. If your ceiling is already at 6’6″ or above, strategies to maximize perceived height are generally sufficient.
5. Kitchen Design for Basement Suites: Function First, Then Finishes
The kitchen is where tenants make their decision. A dark, undersized kitchen with limited counter space will push a prospective tenant toward the next suite on their list, regardless of how well everything else is done. A well-designed kitchen — functional, bright, with enough counter space to prepare a meal — signals that the suite was designed with the occupant in mind. It is one of the two highest-ROI spaces in a basement suite renovation, alongside the bathroom.
Layout Options
The galley kitchen — two parallel runs of cabinets and counter with a work aisle between them — is the best choice for narrow basement footprints. A minimum aisle width of 1,050 mm (42 inches) allows one cook to work comfortably. Galley kitchens are extremely efficient and, when designed well, feel professional rather than cramped. The L-shape kitchen works well in open plan suites, using two walls that meet at a corner, with the open end facing the living area. The corner requires careful planning — a corner cabinet with a lazy Susan or pull-out mechanism prevents dead space. The single-wall kitchen — all appliances and cabinets on one wall — should be a last resort, used only when the footprint genuinely does not permit anything else. It limits counter space and makes cooking for two people awkward.
Appliances
Standard-sized appliances (30-inch range, 30-inch refrigerator) look and feel the most like a full home kitchen and command the best tenant impression. Apartment-sized appliances (24-inch range, 24-inch refrigerator) are appropriate when footprint genuinely cannot accommodate standard sizing, but they signal a compromise. A full-size dishwasher — increasingly expected by Vancouver renters even in basement suites — should be included whenever counter and cabinet layout allows. Tenants who cook frequently rate dishwasher availability as a significant factor in suite selection.
Ventilation
A range hood that vents to the exterior is not just a design choice — it is a requirement under BC Building Code for suites with gas ranges, and strongly recommended for electric ranges. Recirculating range hoods (those that filter air and return it to the room) are acceptable for electric ranges but perform poorly in tight spaces. Running a duct from a below-grade kitchen to the exterior is sometimes challenging — the route may need to run through interior walls to a soffit or through the foundation — but it is always worth doing. A kitchen that fills with steam and cooking odours every time a meal is prepared is a reliable source of tenant complaints and lease non-renewals.
Finishes and Cost Range
For rental suites, finishes need to balance visual appeal with durability. Thermofoil or laminate cabinet doors in white or a neutral tone are the practical choice — they clean easily, resist moisture, and cost roughly half of painted wood cabinets. Quartz countertops have become the expected standard at the mid-range and above: they are non-porous, stain-resistant, and visually comparable to stone. Luxury vinyl plank (LVP) flooring throughout the kitchen is the correct choice — it is waterproof, durable, and warm underfoot. Avoid ceramic tile in kitchen areas of rental suites; grout lines accumulate grime and tenants frequently cite grout cleaning as a maintenance frustration.
| Kitchen Tier | Specifications | Cost Range (Vancouver, 2026) |
|---|---|---|
| Basic | Laminate cabinets, laminate countertop, 24″ appliances, LVP floors | $12,000–$16,000 |
| Mid-Range | Thermofoil/shaker cabinets, quartz countertop, standard appliances, LVP, dishwasher | $17,000–$22,000 |
| High-End | Custom cabinetry, waterfall quartz, quality appliances, tile backsplash, under-cabinet lighting | $23,000–$28,000+ |
6. Bathroom Design: The Space That Wins or Loses the Tenant
The bathroom is the space that tenants inspect most carefully during a viewing. A bathroom that looks clean, bright, and well-maintained creates confidence in the entire suite. A bathroom that looks dated, cramped, or difficult to clean creates doubt — and doubt loses leases. In a basement suite, the bathroom is also where moisture management is most critical: below-grade bathrooms are vulnerable to condensation and humidity accumulation, and a poorly designed bathroom can create persistent mould and moisture problems that are expensive to remediate.
Layout Options
The 3-piece bathroom (toilet, vanity, and shower) is the minimum for a functional suite and is appropriate for studio and one-bedroom configurations. The 4-piece bathroom (toilet, vanity, tub, and separate shower) is the preferred configuration for family suites and is increasingly expected by renters at the mid-range and above. A 4-piece bath adds approximately 10 to 15 square feet of floor space compared to a 3-piece but commands $100 to $200 per month more in rent in the Vancouver market. The payback period on the additional construction cost — typically $4,000 to $8,000 — is 20 to 40 months.
Space-Saving Fixtures
When square footage is tight, space-saving fixtures make a meaningful difference. A wall-hung toilet with an in-wall tank eliminates the visible tank, reduces floor space, and makes cleaning the floor beneath the toilet far easier — a significant benefit in rental suites where cleaning frequency varies by tenant. A compact vanity (18 to 24 inches deep instead of the standard 21 inches) opens floor space without sacrificing too much storage. A curbless shower — a shower with no curb or threshold — makes small showers feel more open and eliminates the trip hazard of a shower curb, which is increasingly valued by tenants of all ages.
Ventilation
BC Building Code requires a mechanical ventilation fan in all bathrooms without an operable window. In a basement suite, this requirement applies almost universally. The fan must vent to the exterior — not to the attic, not to a crawl space, not through a filter and back into the room. Attic-vented bathroom fans are one of the most common code violations in older Vancouver basement suites and one of the most common sources of mould in attic structures. Install a quality, quiet fan (Broan or Panasonic, rated at 50 to 110 CFM) with a timer switch or humidity sensor. Budget $400 to $800 for a properly installed bathroom fan with exterior venting in a below-grade suite.
Tile Selection
Large-format tiles (12×24 inches or larger) reduce grout lines and are significantly easier to clean than small-format tiles. A neutral large-format tile for floors and shower walls — warm white, light grey, or warm beige — appeals to the broadest range of tenants and photographs well for rental listings. Avoid dark grout in tenant-occupied spaces: it shows efflorescence and is difficult to keep looking clean. Epoxy grout in a light colour is worth the premium in shower areas — it is virtually stain-proof and does not harbour mould the way standard cement grout does.
| Bathroom Tier | Specifications | Cost Range (Vancouver, 2026) |
|---|---|---|
| Basic (3-piece) | Tub/shower combo, stock vanity, ceramic tile, builder fixtures | $15,000–$19,000 |
| Mid-Range (4-piece) | Separate tub + shower, semi-custom vanity, large-format tile, quality fixtures | $20,000–$25,000 |
| High-End (4-piece+) | Curbless shower, freestanding tub, custom vanity, heated floor, designer tile | $26,000–$35,000+ |
7. Bedroom Design: Privacy, Light, and Warmth Below Grade
The bedroom is where the tenant spends roughly a third of their time in the suite. A bedroom that is dark, cold, or poorly separated from the sounds of the principal dwelling will drive tenant turnover. A bedroom that is bright, warm, and quiet will keep tenants renewing year after year. Below-grade bedrooms have specific design challenges that are worth addressing deliberately.
Natural Light and Egress
Every bedroom in a legal suite requires an egress window — a window large enough to serve as an emergency exit. This requirement, which exists for life-safety reasons, also happens to be the primary source of natural light in a below-grade bedroom. As discussed in the light section, upgrading beyond the code minimum size for egress windows is one of the highest-value investments in a basement suite. A bedroom with a window that admits genuine daylight is a fundamentally different space from one with a narrow slit at grade level.
Closet Requirements
BC Building Code does not require closets in bedrooms, but tenants do. A bedroom without a closet is essentially unleasable in the Vancouver market — it will either sit vacant or rent $150 to $250 below comparable units. A reach-in closet 24 inches deep and at least 48 inches wide is the minimum. A 60-inch-wide closet allows a centre hanging section plus shelving on each side, which tenants find significantly more functional. Walk-in closets are not expected in basement suite bedrooms — they consume too much floor space — but sliding or bifold closet doors with an organizer system inside effectively serve the same purpose.
Sound Separation
Sound separation in the bedroom is covered in detail in Section 9, but it deserves special mention here. The bedroom ceiling — which is the floor structure of the principal dwelling above — is typically the most significant source of sound transmission in a basement suite. Footsteps, furniture movement, and voices all travel through the floor assembly. A tenant who is woken by footsteps overhead at 6 AM will not renew their lease. Addressing sound transmission through the bedroom ceiling is not a luxury — it is a tenant retention requirement.
Floor Warmth
Concrete basement floors are cold. Not just cool — cold in a way that penetrates through flooring materials and makes a bedroom feel uninhabitable without heating the floor from below. A raised subfloor system — either a sleeper system over a moisture barrier or a prefabricated panel system like DRIcore — creates an air gap between the concrete and the finished floor that dramatically reduces the cold transmission. Combined with LVP or engineered hardwood flooring, a raised subfloor makes a below-grade bedroom feel genuinely comfortable underfoot. Radiant heated floor mats — electric, installed under tile or LVP — are worth considering in bedrooms in colder parts of Metro Vancouver (Surrey, Langley, Burnaby at elevation). Budget $600 to $1,800 for heated floor mats in a bedroom, not including the thermostat.
8. Flooring Choices: What Works and What Does Not Below Grade
Flooring in a basement suite operates in a challenging environment: concrete subfloor, potential for moisture vapour transmission, temperature variation, and heavy tenant use. The wrong flooring choice does not just look bad — it fails structurally, develops mould beneath it, or creates a comfort problem that drives tenants away. The right choice is durable, moisture-resistant, comfortable underfoot, and appealing to a wide range of tenants.
Luxury Vinyl Plank (LVP)
LVP is the correct answer for basement suite flooring in the vast majority of cases. It is 100 percent waterproof (unlike laminate, which delaminated when wet), far more durable than hardwood in a rental context, comfortable underfoot due to its flexibility and foam underlayment, visually indistinguishable from hardwood to most tenants, and available in a range of colours and plank widths. Wide-plank LVP in a warm oak or blonde tone is currently the most popular choice for Vancouver rental suites and photographs extremely well for listings. At $4 to $8 per square foot installed, LVP is also the most cost-effective option that does not compromise on appearance or performance. Select a product rated for residential use with a minimum 6 mil wear layer — 12 mil or more for suites with pets or heavy traffic.
Flooring Options Comparison
| Flooring Type | Cost Installed (per sq ft) | Waterproof | Warmth | Durability (Rental) | Verdict |
|---|---|---|---|---|---|
| LVP (luxury vinyl plank) | $4–$8 | Yes | Good | Excellent | Recommended |
| Engineered hardwood | $8–$14 | No (moisture-resistant) | Excellent | Good | High-end suites only |
| Laminate | $3–$6 | No | Good | Fair | Avoid in wet zones |
| Ceramic/porcelain tile | $6–$12 | Yes | Poor | Excellent | Bathrooms only |
| Polished concrete | $3–$8 | Yes | Poor | Excellent | Not recommended |
| Carpet | $3–$6 | No | Excellent | Poor | Avoid in suites |
Raised Subfloor Systems
Before any finished flooring goes down on a concrete basement slab, a subfloor system should be installed to address moisture vapour and cold transmission. DRIcore panels — 2-foot by 2-foot OSB panels with a dimpled plastic base — are the most common solution: they sit on the concrete with the dimples creating a 5/8-inch air gap and moisture break, and the OSB provides a nailing surface for flooring. Sleeper systems — 2×4 pressure-treated lumber laid flat on a 6-mil poly vapour barrier — serve a similar purpose at a slightly lower material cost but higher labour cost. Either system adds $2.50 to $4.50 per square foot to the project but is worth every cent in a Vancouver basement where moisture vapour transmission is a constant concern, particularly in homes older than 1980.
9. Sound Separation: The Invisible Factor That Determines Tenant Retention
Sound transmission between the basement suite and the principal dwelling above is the leading cause of tenant complaints and the leading reason tenants leave basement suites in Vancouver. It is also the factor that landlords most frequently underestimate during construction — because the impact of poor sound separation is not apparent until after the suite is occupied and the landlord receives their first complaint. Good acoustic design adds $4,000 to $10,000 to a basement suite renovation. Poor acoustic design costs far more in lost rent, tenant turnover, and damaged landlord-tenant relationships.
Two Types of Sound Transmission
Impact sound travels through solid materials — footsteps, furniture being dragged, a child jumping, a dog running across the floor. It travels through the floor structure of the principal dwelling and radiates as sound into the suite below. The primary solution is decoupling the floor assembly above from the ceiling assembly below — preventing vibration from transferring through a rigid connection. Airborne sound travels through the air — voices, television, music, kitchen noise. It travels through gaps and cracks in the floor/ceiling assembly and through any penetrations (plumbing, electrical, HVAC). The primary solution is mass (heavy drywall), absorption (insulation in joist bays), and sealing all penetrations.
Resilient Channels
Resilient channels (RC-1 channels) are horizontal metal strips screwed to the underside of the joists, to which the ceiling drywall is then screwed. The resilient channel decouples the drywall from the joist structure, preventing impact sound from transmitting directly through the framing into the drywall surface. When installed correctly — with no short-circuits where the drywall touches the framing directly — resilient channels can reduce impact sound transmission by 10 to 15 IIC points. This is audible and meaningful. A common and costly mistake is to accidentally screw through the resilient channel into the joist; one short-circuit can negate most of the acoustic benefit.
Acoustic Insulation and Double Drywall
Acoustic batt insulation — Roxul Safe’n’Sound or equivalent — installed between the joists above the suite’s ceiling reduces airborne sound transmission. Standard fibreglass insulation provides some benefit, but acoustic-specific insulation (higher density, optimised absorption) performs measurably better. The cost premium over standard fibreglass is modest — approximately $0.30 per square foot — and the benefit is consistent.
Double-layer drywall on the ceiling — 5/8-inch Type X drywall with a layer of 1/2-inch drywall over it, offset so the seams do not align — adds mass that resists sound transmission and also meets fire-separation requirements between the suite and the principal dwelling. The cost is approximately $1.50 to $2.50 additional per square foot over single-layer drywall but provides meaningful improvement for both sound and fire separation.
Solid-Core Doors
Solid-core interior doors within the suite reduce sound transmission between rooms and between the suite and common areas. Hollow-core doors — the builder standard — provide essentially no acoustic benefit. Solid-core doors in a 1-3/8 inch or 1-3/4 inch thickness cost $150 to $350 each versus $80 to $120 for hollow-core, but they completely change how the suite feels acoustically.
| Acoustic Measure | Cost (per suite) | Impact Sound Benefit | Airborne Sound Benefit |
|---|---|---|---|
| Acoustic batt insulation in joists | $600–$1,200 | Low | High |
| Resilient channels + single drywall | $1,500–$2,500 | High | Medium |
| Double-layer 5/8″ drywall | $1,200–$2,000 | Medium | High |
| Solid-core interior doors | $800–$1,800 | Low | Medium |
| Full acoustic package (all above) | $4,000–$7,500 | Excellent | Excellent |
10. Mechanical Systems: Independent, Efficient, and Code-Compliant
Mechanical systems in a basement suite must satisfy three requirements simultaneously: they must comply with BC Building Code and the City of Vancouver’s secondary suite requirements; they must provide independent, controllable comfort to the tenant; and they must be efficient enough to keep operating costs reasonable. Getting mechanical systems wrong is expensive — both to fix after the fact and to operate long-term.
Heating Options
The City of Vancouver requires secondary suites to have a separate, controllable heating system. Connecting the suite to the principal dwelling’s forced-air system is not acceptable — the tenant must be able to control their own temperature independently. Three heating options are practical for most Vancouver basement suites:
| Heating System | Install Cost | Operating Cost | Tenant Comfort | CleanBC Rebate Eligible |
|---|---|---|---|---|
| Electric baseboard | $1,500–$3,500 | High (BC Hydro step 2) | Fair (dry heat, slow response) | No |
| Mini-split heat pump | $4,000–$8,000 | Low–Medium | Excellent (heat + cooling) | Yes (up to $6,000) |
| In-floor hydronic (new slab) | $8,000–$15,000 | Low (gas boiler) / Medium (electric) | Excellent (radiant comfort) | Partial |
The mini-split heat pump is the recommended choice for most new basement suite projects. It provides both heating and cooling (increasingly important as Vancouver summers intensify), operates at approximately 300 percent efficiency compared to electric baseboard, and qualifies for significant CleanBC rebates. A single-zone mini-split is sufficient for suites up to 700 square feet; a two-zone system works well for larger suites or split-plan layouts where bedrooms are remote from the living area.
Hot Water
The suite requires access to hot water, but it need not have its own dedicated water heater. Options include: a separate tankless water heater dedicated to the suite (cleanest separation, easiest to sub-meter, cost $1,200 to $2,500 installed); a shared tank with a check valve and flow meter to measure usage (lower install cost, but requires a sub-metering arrangement in the rental agreement); or an electric heat pump water heater serving the suite (highly efficient, qualifies for rebates, $1,500 to $3,000 installed). The City of Vancouver does not mandate a dedicated water heater but strongly recommends it for suites intended for long-term occupancy.
Electrical Sub-Panel
The suite requires its own electrical sub-panel — a breaker panel fed from the main service that provides independent circuits for the suite’s lighting, receptacles, kitchen appliances, and heating system. A minimum 60-amp sub-panel is appropriate for most suites; 100 amps is preferred when the suite includes electric baseboard heating or electric cooking. The BC Electrical Code requires that the suite’s wiring be separated from the principal dwelling’s wiring, and that the suite have its own dedicated circuits for the kitchen and bathroom. Budget $2,000 to $4,000 for sub-panel installation and suite wiring.
Ventilation (HRV)
BC Building Code requires mechanical ventilation for all habitable rooms in a basement suite that do not have operable windows meeting the code’s ventilation area requirement. In practice, most below-grade suites require a mechanical ventilation system. A standalone HRV (Heat Recovery Ventilator) serving only the suite is the preferred solution — it provides continuous fresh air exchange while recovering 70 to 80 percent of the heat from the exhaust air, reducing heating costs. HRVs designed for suite use are compact and can be mounted in a closet or utility space. Cost: $2,500 to $5,000 installed. Alternatively, an exhaust-only system using bathroom fans on timer switches can meet minimum code requirements at lower cost, though it provides inferior air quality.
11. Finishing Standards by Market: What You Invest vs. What You Earn
Not every basement suite renovation justifies the same level of finish investment. The right finishing standard depends on your rental market, the size of the suite, and your investment horizon. Here is the honest breakdown of what each tier costs, what it rents for, and whether the premium investment pays back.
Basic Finish: $1,600–$1,900/month
A basic-finish suite meets all code requirements, functions correctly, and is clean and livable, but it does not excite prospective tenants. Typical specifications: builder-grade LVP flooring, laminate countertops, thermofoil or laminate cabinets in a neutral colour, a 3-piece bathroom with a tub-shower combo and stock vanity, single-layer drywall ceiling without acoustic treatment, electric baseboard heating, standard pot light fixtures. A basic suite in East Vancouver or Burnaby rents for approximately $1,600 to $1,900 per month for a one-bedroom and $1,900 to $2,200 for a two-bedroom. Vacancy between tenants is typically 3 to 6 weeks. Tenant retention averages 18 to 24 months before a tenant moves to a better suite.
Mid-Range Finish: $2,000–$2,400/month
A mid-range suite exceeds the code requirements in the areas that tenants notice: better light, better sound, a more functional kitchen, a 4-piece bathroom. Typical specifications: upgraded wide-plank LVP with moisture-resistant underlayment, shaker-style thermofoil cabinets, quartz countertops, dishwasher, standard-size stainless appliances, 4-piece bathroom with separate tub and shower, large-format tile, acoustic insulation and resilient channels in the ceiling, mini-split heat pump, recessed LED lighting on dimmers. A mid-range suite in East Vancouver rents for $2,000 to $2,400 per month for a one-bedroom. Vacancy between tenants is typically 1 to 2 weeks. Tenant retention averages 30 to 48 months.
High-End Finish: $2,500–$3,200/month
A high-end suite is designed to appeal to professional tenants willing to pay a premium for genuine apartment-quality finishes below grade. Typical specifications: engineered hardwood over hydronic heated floors, custom cabinetry with quartz countertops and full-height tile backsplash, premium appliances, 4-piece bathroom with curbless shower and freestanding tub, heated tile floors, full acoustic package, mini-split system, HRV, high-end fixtures and hardware throughout. A high-end suite in a premium East Vancouver or West Side location rents for $2,500 to $3,200 per month. Vacancy is typically less than one week and tenants frequently remain for 4 to 7 years.
ROI Analysis: Is the High-End Finish Worth It?
The cost difference between a mid-range and high-end finish is approximately $25,000 to $35,000. The rent difference is approximately $200 to $600 per month depending on location and suite size. At $300 per month extra rent (the middle of the range), the payback period on the $30,000 premium is 100 months — just over 8 years. Add the reduced vacancy and lower turnover costs of a high-end suite and the true payback period is closer to 6 to 7 years. For homeowners planning to stay in the property long-term, the high-end finish frequently makes sense. For those with a shorter horizon, mid-range is almost always the better investment.
| Finish Tier | Total Reno Cost | Monthly Rent | Annual Rental Income | Gross Yield (on reno cost) |
|---|---|---|---|---|
| Basic | $55,000–$75,000 | $1,700 | $20,400 | 27–37% |
| Mid-Range | $80,000–$110,000 | $2,200 | $26,400 | 24–33% |
| High-End | $120,000–$160,000 | $2,800 | $33,600 | 21–28% |
Note: These costs include permit fees, design, full construction, mechanical, and finishing. They assume a suite of approximately 650 to 800 square feet. Costs vary significantly with site conditions, existing structure, and required underpinning.
Ready to start planning? Our team specialises in legal secondary suite construction throughout Metro Vancouver. Visit our home renovation services page to learn more, review our complete renovation guide for budgeting and planning advice, or contact us directly for a free site assessment.
More Basement & Secondary Suites Guides
Drywall vs. Drop Ceiling for Your Vancouver Basement: Cost and Practicality Compared

Carpet vs. LVP Basement Flooring in Vancouver: Which Handles Moisture Better?
Wood vs. Steel Stud Framing for Vancouver Basement Walls: Which is Better?
Interior vs. Exterior Basement Waterproofing in Vancouver: Which is More Effective?
Basement Subfloor Options Sleepers Dricore Lvp Concrete
Ready to start your renovation?
12. Frequently Asked Questions: Basement Suite Design in Vancouver
What is the minimum size for a legal suite in Vancouver?
The City of Vancouver does not specify a single minimum floor area for a secondary suite, but the BC Building Code requirements for individual room sizes effectively set the minimum. A functional legal suite with one bedroom requires at minimum a bedroom of 7.4 m² (approximately 80 sq ft), a living area of 13.5 m² (145 sq ft), a kitchen space adequate for required appliances, and a 3-piece bathroom. In practice, a suite of less than 400 square feet is very difficult to make functional and livable. Most legal one-bedroom suites in Vancouver range from 500 to 800 square feet, with two-bedroom suites typically 700 to 1,000 square feet.
Does a basement suite require a separate entrance?
Yes. The City of Vancouver requires that a secondary suite have a separate entrance from the principal dwelling. This entrance must be accessible from the exterior without passing through the principal dwelling’s living space. The entrance can be a dedicated exterior stair to a below-grade door, a side entry from the yard, a rear entry from a laneway, or a shared entry vestibule with separate locked doors leading to the suite and the principal dwelling. The entrance requirement exists for both safety (emergency egress) and the tenant’s right to private, unencumbered access to their home.
What is the minimum egress window size in BC?
BC Building Code Section 9.9.10 requires bedroom egress windows to have a minimum openable area of 0.35 m² (3.77 sq ft), with no dimension less than 380 mm (15 inches). The window must be openable from the inside without a key or special tool. For below-grade windows, this typically means a window with an opening of approximately 24 inches wide by 24 inches tall at minimum. We strongly recommend exceeding this minimum — a 24″ x 36″ or 24″ x 48″ egress window provides substantially more light and feels far less confining than the code minimum. The additional cost is modest compared to the impact on livability.
Do I need a permit for a basement suite in Vancouver?
Yes, a building permit is required to construct or legalize a basement suite in the City of Vancouver. The permit application requires drawings showing the suite layout, egress windows, ceiling heights, and mechanical systems. The project will be inspected at framing, rough-in mechanical and electrical, insulation, and final occupancy stages. Permit fees in Vancouver are typically $1,500 to $4,000 for a basement suite, depending on the value of the work. Building without a permit is illegal and creates significant liability problems when selling the home — buyers’ agents and lenders routinely check for suite permits, and an un-permitted suite discovered at sale can collapse a transaction. Always permit your suite.
My basement ceiling is only 6 feet 2 inches — can I still make a legal suite?
A finished ceiling height of 6’2″ (approximately 1.88 m) is below the BC Building Code minimum of 1.95 m (6’5″) for habitable rooms. At this height, you have two options: underpin the foundation to lower the slab and achieve the required clearance, or accept that a legal suite is not possible at your current ceiling height. Underpinning costs $40,000 to $100,000 but permanently resolves the height issue and typically adds $150,000 or more to the home’s resale value in the Vancouver market. The decision depends on your investment horizon and the home’s overall value. A structural engineer and your permit application consultant can advise on underpinning feasibility for your specific home.
Can I use a murphy bed in a basement suite bedroom?
A murphy bed (wall bed) can be used in a studio suite where the living area and sleeping area are combined, but it does not substitute for a dedicated bedroom in a multi-room suite. BC Building Code requires that a bedroom have a minimum area of 7.4 m² (80 sq ft) measured with the bed in its sleeping position — a murphy bed in its folded-up position does not satisfy this requirement. Murphy beds are best suited to studio-style suites where a separate bedroom is not part of the design, or to den spaces described as flex rooms rather than bedrooms. A properly sized bedroom with a built-in closet will always command more rent than a studio suite with a murphy bed, because it can be occupied by more people in the same square footage.
Does the suite need separate laundry?
BC Building Code does not require a dedicated laundry area in a secondary suite, and the City of Vancouver’s secondary suite requirements do not mandate laundry. However, tenants strongly prefer in-suite laundry — it is one of the most frequently cited requirements in Vancouver rental listings. A suite without in-suite laundry will rent for $100 to $200 per month less than a comparable suite with it, and it will attract a narrower pool of applicants. A stacked washer-dryer combination fits in a closet as small as 28 inches by 28 inches and requires a 240V outlet, a cold-water supply, and a drain. If you are designing a new suite, plan for laundry from the beginning — retrofitting the plumbing and electrical later is significantly more expensive.
How effective is soundproofing between a suite and the house above?
Soundproofing between a basement suite and the principal dwelling can be highly effective when done correctly during construction, and very difficult to improve significantly after the fact. A full acoustic package — acoustic batt insulation in the joist bays, resilient channels on the ceiling, double-layer 5/8-inch drywall, solid-core doors, and sealed penetrations — can achieve an STC (Sound Transmission Class) rating of 52 to 58, which means normal speech in the room above is not audible in the suite below. The key failure mode is installing resilient channels but then accidentally short-circuiting them during drywall installation. Have your acoustic treatment inspected before drywall is closed, and test the result by having someone walk and jump above while you listen in the suite before occupancy.
What is the best flooring for a concrete basement floor?
Luxury vinyl plank (LVP) over a DRIcore or sleeper subfloor is the best flooring system for a concrete basement slab in Vancouver. The subfloor creates a moisture break between the concrete and the finished floor, preventing vapour transmission from causing flooring failure. LVP is waterproof, durable, comfortable underfoot (especially with its foam underlayment), and visually appealing. At $4 to $8 per square foot installed (plus $2.50 to $4.50 for the subfloor system), it is the most cost-effective solution that does not compromise on performance. Avoid installing standard laminate directly on concrete — it will swell and delaminate within one to three years in a Vancouver basement. Avoid hardwood directly on concrete for the same reason.
What heating system should I choose for a basement suite?
For new basement suites in 2026, the mini-split heat pump is the recommended choice in almost all cases. It provides efficient heating and cooling from a single system, qualifies for CleanBC rebates of up to $6,000 on the installed cost, and gives tenants independent temperature control in both heating and cooling modes. Electric baseboard heating is simpler to install and has no mechanical components to service, but it is significantly more expensive to operate — roughly 3 times the operating cost of a heat pump for the same heat output — and provides no cooling. In-floor hydronic heating is the most comfortable option but the most expensive to install; it makes sense primarily in custom high-end suites or when the boiler infrastructure already exists in the home.
What are the minimum kitchen requirements for a legal suite?
BC Building Code does not prescribe a minimum kitchen area, but it requires that the kitchen accommodate a refrigerator, a cooking appliance, a sink with hot and cold running water, and adequate counter and storage space for food preparation. The cooking appliance must connect to an approved fuel source (gas or electric) with appropriate safety provisions. A range hood venting to the exterior is required with gas cooking and strongly recommended with electric. The City of Vancouver additionally requires that the kitchen exhaust system be independent from the principal dwelling’s systems. In practice, a functional suite kitchen needs at minimum one countertop run of 1.8 metres (6 feet) with a sink, a 24-inch or 30-inch range, a refrigerator, and base and upper cabinets on the same wall.
How can I maximize light in a below-grade suite?
The most effective strategies in order of impact: (1) Enlarge all egress windows to the maximum size the opening allows — this is the single highest-impact light improvement possible. (2) Install reflective window well liners and polycarbonate covers to bounce more daylight through existing windows. (3) Use light colours everywhere — white ceilings, pale walls, blonde or light grey LVP flooring — to reflect available light throughout the space. (4) Layer artificial lighting thoughtfully: ambient recessed LEDs at 3,000K on dimmers, task lighting in the kitchen and bathroom, accent lighting to create warmth. (5) Use an open plan layout where possible to allow daylight from windows to reach deeper into the space. (6) Install sun tunnels in interior rooms adjacent to exterior walls where a window is not possible. Dark basement suites are almost always solvable with a combination of these strategies.
How do I provide storage for suite tenants?
Suite tenants have the same storage needs as any renter: a bedroom closet, kitchen cabinet storage, bathroom storage, and ideally a small utility or storage area. The bedroom closet should be at least 48 inches wide with a shelf and hanging rod; deeper closets (24 inches) with a simple organizer system work well in suites where space allows. Under-stair storage, if the suite layout includes a stairway, is worth finishing and locking as tenant storage. A utility area with a laundry pair and additional shelving — even 4 feet wide — adds meaningful storage without consuming much space. If the suite footprint is very tight, a lockable storage cage in a common mechanical room is a reasonable alternative; tenants value any dedicated storage over none.
How much does it cost to add an exterior entrance to a basement suite?
An exterior entrance to a basement suite costs $8,000 to $25,000 depending on the configuration. A simple side-door entry at the existing grade — where the door is already at or near basement level — is the least expensive option at $3,000 to $8,000 including a small landing, weatherproofing, and a keyed entry system. An exterior stairwell with a below-grade door — the most common configuration when the basement is fully below grade — requires excavation beside the house, a concrete stairwell structure, drainage at the bottom, a weatherproof cover or awning, and a proper threshold. This typically costs $10,000 to $18,000. A rear entry from a laneway, which is popular in Vancouver’s laneways-rich neighbourhoods, costs $6,000 to $14,000 depending on whether regrading is required.
What is the City of Vancouver inspection process for a new basement suite?
After a building permit is issued, the City of Vancouver requires inspections at several stages of construction. The first is a framing inspection after structural framing is complete but before walls are closed. The second is a rough-in inspection for plumbing and electrical — inspectors verify that all rough-in work meets code before it is concealed. The third is an insulation inspection confirming that fire and acoustic separation assemblies meet requirements. The final inspection is the occupancy inspection, at which the inspector confirms that all systems are complete, egress windows are installed, alarms are functioning, and the suite is ready for occupancy. A Certificate of Occupancy (or approval) is required before the suite can be legally occupied and advertised for rent. The entire permit and inspection process typically takes 6 to 14 months from application to final occupancy, depending on permit queue times and construction pace.
Planning a basement suite in Vancouver? Our team at Vancouver General Contractors has completed dozens of legal secondary suites across Metro Vancouver. We handle the design, permit application, construction, and inspection process from start to finish. Contact us for a free consultation or visit our renovation guide to start planning your project.
 North Vancouver” class=”wp-image-12856″ />
Get a Free Renovation Quote
Metro Vancouver’s trusted general contractors. Free consultations across Vancouver, Burnaby, Richmond, North Shore & beyond.
Get Your Free Quote →Ready to start your project? Vancouver General Contractors (VGC) provides free, fixed-price quotes for homeowners across Metro Vancouver. Learn more about our basement renovation Vancouver services or request a free quote today.
VGC serves Vancouver and surrounding areas. View all renovation services in Vancouver →
Comments are closed