
Laneway House Design Ideas for Vancouver: Floor Plans, Styles, and What Builders Actually Recommend (2026)
You’ve decided to build a laneway house on your Vancouver lot. The zoning question is settled, the financing is lined up, and now comes the part that actually determines whether your investment pays off: design. The layout you choose, the systems you specify, the exterior style you land on — these decisions lock in your rental income, your construction budget, and your long-term maintenance costs for decades.
VGC has designed and built more than 30 laneway houses across Metro Vancouver. This guide shares exactly what we’ve learned: which floor plans perform best for rental income, which design shortcuts cost you money later, how to make a 650 sq ft suite feel genuinely spacious, and what the Vancouver rental market is actually paying in 2026 for each type of unit. Read it before you finalize your drawings.
Vancouver Laneway House Regulations That Shape Every Design
Every design decision you make happens within a regulatory box set by the City of Vancouver. Understanding these limits upfront prevents the most expensive outcome in laneway construction: a set of drawings that need to be redone after permit review.
Knowing these numbers before you start design work is not optional — it is the difference between a $300 permit approval and a $2,000 revised-drawing resubmission
Vancouver General Contractors
Key Rules Under Vancouver’s R1-1 Zoning (Updated 2023)
Vancouver’s 2023 Residential Inclusive (R1-1) zoning change unlocked laneway houses on the vast majority of single-family lots in the city. Here are the parameters every design must respect:
- Maximum floor area: 83.6 sq m (900 sq ft), including any above-garage portion. This is your absolute ceiling — plan to get close to it if rental income is the goal.
- Maximum height: 6.0 m for a single-storey structure, or 6.7 m if you include a loft or partial second storey. The loft option adds meaningful livable space without technically crossing into a two-storey building.
- Rear setback from lane: 1.0 m (or 0.6 m if no parking is provided). Most Vancouver lots measure this as the distance from the back of the structure to the lane right-of-way.
- Interior side setback: 0.9 m on each side. On a standard 33-foot lot this leaves approximately 8.1 m (26.6 ft) of buildable width — tight but workable.
- Separate lane entrance required. The laneway house must have its own entrance directly accessible from the lane, not from the main house or its rear yard.
- Parking: one space required, unless the lot is within 800 m of a frequent transit stop. A large share of Vancouver lots qualify for the transit waiver — check the City’s map before assuming you need a garage. The waiver saves $40,000–$80,000 in construction cost.
- Heritage character overlay: Some older RS lots have character home protections. The laneway house design should be complementary in style and materials to the principal dwelling — it does not need to match, but it should not clash.
The practical implication: if your lot is 33 ft wide and 110 ft deep (a very common Vancouver standard lot), your laneway envelope is roughly 8.1 m wide × 8.0 m deep = 64.8 sq m on the ground floor. A two-bedroom loft can reach 900 sq ft total by using the loft allowance. A well-designed one-bedroom at 600 sq ft leaves room for a covered outdoor area within the lot depth.
Knowing these numbers before you start design work is not optional — it is the difference between a $300 permit approval and a $2,000 revised-drawing resubmission. Get a pre-application meeting with the City or engage a design-build firm that pulls permits routinely in Vancouver.
The Five Most Popular Vancouver Laneway House Layouts
There is no single best floor plan. The right layout depends on who you are building for, what rental income you expect, whether you need parking, and how much you want to spend. Here are the five configurations VGC builds most frequently, with honest assessments of each.
A. Studio / Bachelor (350–500 sq ft) — Entry-Level Rental Income
The studio plan uses the entire footprint as a single open-plan space: living area, kitchen, and a sleeping alcove or murphy bed recess. A full bathroom is separated by a wall or pocket door. A small covered deck (4–6 ft deep) extends the usable space and is essential for livability in a unit this size.
Best for: single occupant rental income, adult child suite, short-term use while you save for a larger unit later. Studios are also the fastest to permit and build.
Typical all-in construction cost: $180,000–$280,000 depending on finishes and whether the parking waiver applies. This is the most accessible entry point for laneway construction.
Caution: Studios have the lowest rental income ceiling (see the rental table in section 11). If you are investing primarily for income, the one-bedroom or loft layout delivers meaningfully better returns relative to the additional build cost.
B. One-Bedroom (500–650 sq ft) — The Most Versatile Plan
A separate bedroom with a closing door — that single addition over the studio dramatically expands your tenant pool. The one-bedroom plan typically allocates: 200–250 sq ft to open-plan kitchen and living, 120–140 sq ft to the bedroom, 60–70 sq ft to a full bathroom, and the remainder to entry, storage, and a covered outdoor area.
Best for: long-term tenants (couples, professionals), higher stable rental income, property that you want to remain competitive for 10+ years.
Typical all-in construction cost: $240,000–$360,000. This is the plan VGC most frequently recommends as a starting point for homeowners who are unsure which layout to choose. The rental premium over a studio almost always justifies the additional construction cost within the first few years.
C. Two-Bedroom Loft (700–900 sq ft) — Maximum Rental Income
The loft configuration takes full advantage of Vancouver’s 6.7 m height allowance. The main floor carries the kitchen, living area, a full bathroom, and the primary bedroom. The loft — accessed by a staircase with built-in storage drawers — provides a second bedroom. The loft qualifies as habitable space provided it meets BC Building Code minimum ceiling height requirements over the majority of its area.
Best for: maximum rental income, families needing a guest suite or in-law accommodation, homeowners planning to live in the laneway themselves while tenants occupy the main house.
Typical all-in construction cost: $300,000–$500,000+, depending on size, finishes, whether a garage is included, and site conditions. The loft adds structural complexity (floor framing, staircase, fire separation) that pushes costs up — but the rental premium is the highest of any layout type.
D. Above-Garage Suite (500–700 sq ft) — When Parking Is Required
On lots where the transit waiver does not apply, a garage is required. The above-garage configuration puts a single- or double-car garage on the ground floor and the entire living suite above it. The result is a living space elevated above grade — better views down the lane, more privacy, and natural separation from the garage below.
Best for: lots where parking is required by the City, narrow lots where ground-level garden suite is not feasible, clients who want to rent the garage separately as storage.
Typical all-in construction cost: $280,000–$420,000 including both the garage and the suite above. The garage structure is expensive — concrete slab, roll-up door, structural floor system for the suite above. If your lot qualifies for the parking waiver, a garden suite will almost always cost less and offer more living space per dollar.
E. Garden Suite / No-Garage Ground-Level Plan (600–900 sq ft) — Best Livability
When the parking waiver applies — as it does for a large proportion of Vancouver lots — eliminating the garage entirely unlocks the full lot footprint for living space. A garden suite at grade uses the entire permitted envelope for bedrooms, kitchen, living area, and a covered patio. Ground-level units also tend to have better indoor-outdoor connection, which tenants consistently rate as a priority.
Best for: maximum livability and rental appeal, families with children or pets (direct yard access), aging-in-place accessible design, lowest cost per square foot of living space.
Typical all-in construction cost: $250,000–$450,000. This is often the highest-value configuration when the parking waiver applies — the money that would have gone into garage construction goes directly into living space quality.
Laneway House Foundation Options: Slab vs. Crawl Space vs. Partial Basement
The foundation decision is made before the first framing nail goes in, but it affects every subsequent maintenance call and mechanical repair for the life of the building. Vancouver’s soil conditions (often clay-heavy, sometimes near the water table) add complexity that the Lower Mainland’s wet climate makes more pronounced than in drier climates.
| Foundation Type | Cost Premium | Best For | Vancouver Considerations |
|---|---|---|---|
| Concrete slab on grade | Baseline (no premium) | Budget builds, single-storey, accessible entry | Most common in Vancouver laneways; limited storage; no access to underfloor mechanical; provides step-free entry naturally |
| Crawl space | +$8,000–$18,000 | Access to plumbing/HVAC, better thermal performance | Access panel for future plumbing repairs without cutting concrete; significantly reduces heat loss from slab edge; adds ~18–24 in of clearance |
| Partial basement | +$25,000–$50,000 | Storage + mechanical room, larger projects | Uncommon in laneways due to cost, excavation challenges, and lane setback constraints; may trigger additional engineering requirements |
VGC recommendation: crawl space for most clients. The $8,000–$18,000 premium is recovered in the first major plumbing or HVAC repair. Accessing a burst pipe under a concrete slab requires breaking concrete — a $3,000–$8,000 job that happens exactly once before homeowners understand why the crawl space was worth it. Crawl spaces also provide measurably better thermal envelope performance, which matters in a rental unit where the tenant controls the thermostat.
The one exception: above-garage suites use the garage slab as their ground floor by definition. In that configuration, the slab is the only practical option.
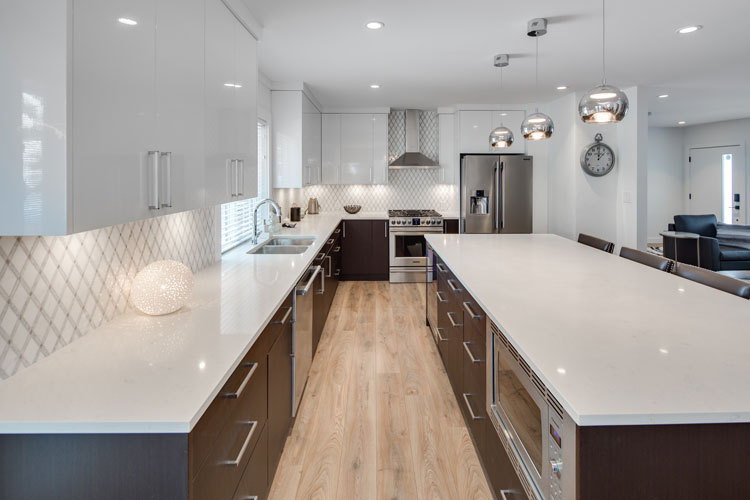
Interior Design: How to Make a Laneway House Feel Spacious
Square footage on paper does not translate directly to livability. A 600 sq ft laneway suite designed by someone who understands small-space architecture will feel more generous than an 800 sq ft unit with poor layout decisions. These are the specific choices that make the difference in Vancouver laneways.
Ceiling Height: The Single Most Impactful Upgrade
BC Building Code sets the minimum habitable ceiling height at 7 ft 11 in (2.4 m). Most production builders hit that number and stop. Raising the ceiling to 9 ft (2.74 m) adds $3,000–$6,000 to the framing and drywall cost and transforms how the space feels — and photographs, which matters for rental listings. VGC includes 9 ft ceilings as standard in all laneway builds. Never accept 8 ft as a compromise in a unit this small.
Open Plan Main Floor
Every interior wall on the main floor of a studio or one-bedroom laneway suite is a decision to make the space feel smaller. Where building code allows (and it allows a great deal at this scale), keep the kitchen, living, and dining areas as a single connected volume. The only walls that should exist on the main floor are around the bathroom and, in a one-bedroom plan, around the bedroom itself.
Addressing the North-Facing Reality
Vancouver’s laneways typically run east-west through residential blocks. A laneway house facing north toward the lane — which is the most common orientation on north-south streets — gets limited direct sunlight. This is a real design challenge that requires a deliberate response:
- Skylights: A single fixed skylight over the kitchen or living area can deliver more light than an additional window on a north wall. Budget $1,500–$3,500 for a fixed unit; $3,000–$6,000 for an operable skylight that also provides ventilation.
- Clerestory windows: High windows on the east or west gable end walls bring in morning or afternoon light that sweeps across the ceiling and upper walls — far more effective than low windows on a north face.
- Light-reflecting finishes: White or light-toned ceilings and upper walls, light flooring, and minimal window treatments all amplify available natural light in a way that dark or saturated finishes completely defeat.
- Place south-facing windows strategically: The rear of the laneway house (facing the main house) often faces south. Place the kitchen or a bedroom window on the south face to capture direct sunlight, then use the open plan to distribute that light through the unit.
Murphy Beds and Convertible Furniture
In a studio or small one-bedroom, a quality murphy bed (wall bed) is not a gimmick — it is a functional necessity. A $3,000–$6,000 murphy bed with integrated shelving and a fold-down desk converts the bedroom area into daytime living space. When the bed folds up, the suite functions as a one-room apartment with full movement. When it folds down, it functions as a proper bedroom. Tenants in Vancouver are entirely accustomed to this configuration and frequently request it.
Built-In Storage Throughout
Storage is the number one complaint tenants cite in small suites. Address it architecturally rather than leaving it to the tenant’s furniture choices. Key built-in opportunities in Vancouver laneways:
- Loft staircase with drawers built into each riser — converts dead stair volume into 8–12 deep drawers
- Entry bench with cabinet storage below and hooks above — essential for Vancouver’s rain gear reality
- Full-height kitchen cabinets to the ceiling — eliminates the dust-collecting gap above standard upper cabinets
- Under-bed storage in loft bedroom — the sloped ceiling area that can’t be used for standing is ideal for low-profile storage
Covered Outdoor Space: Vancouver’s Essential Addition
Vancouver receives 1,155 mm of rain annually. An uncovered deck is useful roughly four months of the year. A covered deck — even a 6 ft × 10 ft roofed area outside the main entry — extends usable outdoor living to 10–11 months. Add $5,000–$15,000 to the budget for a proper covered outdoor area; it consistently appears on tenant preference surveys as a top amenity in small Vancouver rentals. This is one of the few upgrades where tenant feedback is unambiguous: covered outdoor space commands measurably higher rent.
Kitchen Layout for Small Suites
The galley kitchen (two parallel runs of countertop) and the L-shaped kitchen with island seating are the two configurations that work best in Vancouver laneway footprints. Both allow one cook to work efficiently without the kitchen dominating the visual space. An island that doubles as a dining table for two seats is now standard in Vancouver laneways — it eliminates the need for a separate dining table that would consume 20–30 sq ft of floor area.
Bathroom Design
In a rental laneway suite, a bathtub consumes 14–16 sq ft of bathroom floor area for a feature most tenants rarely use. A well-designed curbless walk-in shower — which also satisfies accessibility requirements — returns that space to circulation and storage. A 36 in × 36 in shower with a quality rain head and proper waterproofing is what tenants actually want in a small suite. Save the soaker tub for the main house renovation.
Exterior Design: Vancouver’s Laneway Aesthetic
The exterior of your laneway house faces the lane, not the street — a fact that shapes almost every exterior design decision. Where a street-facing house needs to perform for neighbours and passersby, a laneway house primarily needs to perform for the tenant arriving home and for the rental photos that determine whether your listing gets clicks.
The Four Dominant Styles in Vancouver Laneways (2024–2026)
Modern Farmhouse is the most popular laneway exterior style in Metro Vancouver right now. Board and batten vertical siding, black window frames, a metal roof accent or full metal roof, and a covered front entry porch. It photographs well, ages gracefully, and works with a wide range of lot contexts. This is the style VGC builds most frequently when clients have no strong preference.
Contemporary / Clean Modernist uses Hardie panel or smooth fibre cement siding in a dark charcoal or warm white, large fixed windows, and a flat or very low-pitch roof. It works best on east-side lots and newer neighbourhoods where the contemporary aesthetic does not conflict with adjacent character homes.
West Coast Modern incorporates cedar board and batten or cedar shiplap siding, corrugated metal roof and accent panels, generous glazing, and warm wood detailing around the entry. This style ages well in Vancouver’s climate if the cedar is properly finished with a UV-blocking penetrating oil or stain — skip this step and you are refinishing in 5–7 years.
Traditional Complementary matches the character of an older principal dwelling: lap siding in a compatible colour, painted wood trim, divided-light windows, and a gable roofline. Required on lots with character home overlay; often the right choice aesthetically even where not required.
Roofing: Metal vs. Asphalt
Standing seam metal roofing has moved from a premium option to a strongly recommended choice for Vancouver laneways. The reasons are specific to the climate and the rental context. Asphalt shingles on a low-pitch laneway roof — common in Vancouver — typically last 15–20 years in the Lower Mainland’s wet environment. Standing seam metal lasts 50+ years, requires essentially no maintenance, handles snow and heavy rain drainage better, and looks sharp in photos. The cost premium is $8,000–$15,000 over a comparable asphalt roof. For a building you are constructing as a long-term income asset, this is the right investment.
Black Window Frames
Black-framed windows are to the 2020s laneway house what white trim was to the 1990s bungalow: an almost universally flattering choice that adds $2,000–$5,000 over standard white vinyl or aluminium frames. In rental listing photography, black-framed windows are consistently associated with higher-quality units in Vancouver. If your budget is tight, prioritize black frames on the lane-facing elevation and use standard frames elsewhere.
Mechanical and Systems Planning for Vancouver Laneways
Mechanical systems in a laneway house are not an afterthought — they are a substantial portion of the budget and a significant driver of long-term operating costs for your tenant and maintenance costs for you. Here is what the current best practice looks like in Vancouver laneways.
Heating and Cooling: Ductless Mini-Split Heat Pump
The ductless mini-split heat pump is the established standard for Vancouver laneways. It heats and cools (Vancouver’s summers increasingly require cooling), requires no ductwork, and qualifies for the CleanBC rebate program — currently up to $4,000 for a heat pump installation. A single-head unit handles units under 650 sq ft; a two-head system (one for the main floor, one for the loft bedroom) works well in larger configurations. Installed cost: $4,500–$9,000 before the rebate.
Hot Water
A tankless on-demand water heater eliminates the 40–60 gallon tank that would consume meaningful floor or mechanical space in a small suite. Gas tankless heaters recover faster than electric for back-to-back shower use (relevant if you are building a two-bedroom for family use). Installed cost: $1,500–$3,500. In buildings targeting maximum efficiency, a heat pump water heater is worth considering — better operating efficiency, but higher upfront cost and requires adequate mechanical room air volume.
Ventilation: HRV Required
BC Building Code requires a Heat Recovery Ventilator (HRV) in new residential construction. In a tight, well-insulated laneway house, the HRV provides continuous fresh air exchange while recovering 70–80% of the heat from outgoing stale air — a meaningful efficiency gain in a small space. Installed cost: $2,500–$4,500. Do not let a builder suggest skipping the HRV — it is code-required and genuinely important for indoor air quality in an airtight small structure.
Electrical Service
A laneway house requires its own electrical meter, separate from the main house. A 100-amp service is standard for units under 700 sq ft without an EV charger. If you are building a larger unit or want to future-proof for an EV charger (increasingly expected by tenants in Vancouver), specify 200-amp service — the cost difference during construction is modest compared to upgrading later. Total electrical service cost: $6,000–$12,000 depending on the distance from the utility connection point to the laneway structure.
Plumbing
The laneway house can connect to the existing home’s water service (with a separate sub-meter) or to an entirely new independent service from the city main. New independent service is more expensive ($3,500–$8,000) but eliminates any risk of the main house tenant and laneway tenant disputing water bills. The City of Vancouver typically requires a separate connection for rental units. Confirm the requirement with your permit application before finalizing the mechanical design.
Internet and Low-Voltage Infrastructure
Run conduit for internet, cable, and any future smart home wiring during construction. The cost during the build is $200–$500. The cost to add it after drywall is installed is $1,500–$4,000 plus patching and repainting. This is one of the most consistently overlooked items in laneway construction — and one of the easiest to get right if you think about it during rough-in.
Seismic Strapping
BC Building Code requires seismic strapping for hot water tanks in all new construction. For laneway houses on shallow slab foundations — particularly in areas of Vancouver with looser soil conditions — your structural engineer may specify additional hold-down hardware. This is not optional and should be included in any proper structural drawing package.
Accessibility Design in Vancouver Laneways
Accessibility is not just a regulatory trend — it is a design decision that makes your laneway house more livable for a wider range of tenants, future-proofs the investment for aging-in-place use by family members, and can qualify for financial incentives. Here is what accessible laneway design looks like in practice.
Barrier-Free Entry
A slab-on-grade foundation naturally provides a step-free entry — no raised platform, no exterior stairs to the front door. This is the single most impactful accessibility feature, and it costs nothing extra on a slab foundation. The threshold at the door should not exceed 13 mm (half an inch) — a standard detail in any quality door installation. On a crawl space foundation, a short ramp or gradual approach can achieve the same result for $800–$2,000.
Wider Doors and Circulation
Standard residential door widths are 30 inches. An accessible laneway entry door should be 34–36 inches; interior doors should be 32 inches minimum. The framing cost difference is essentially zero — it is a specification change, not a construction change. Wider doors admit wheelchairs, large furniture, and the reality that tenants’ mobility needs may change over a 10-year tenancy.
Curbless Walk-In Shower
A curbless (zero-threshold) shower with a fold-down bench is the accessible standard for bathrooms, and it also happens to be the design choice most Vancouver laneway tenants prefer regardless of accessibility needs. The additional waterproofing cost over a standard curbed shower is $300–$600 — negligible relative to the rental and resale value it adds.
Future-Proofing: The Aging-in-Place Argument
Many Vancouver homeowners building laneway houses in 2026 are in their 40s and 50s. In 20–25 years, that laneway house may be where they or an aging parent choose to live. Designing for accessibility now — wider doors, step-free entry, blocking in bathroom walls for future grab bars — costs $2,000–$5,000 during construction and potentially $20,000–$40,000 to retrofit later. The CMHC MLI Select mortgage insurance program also offers premium reductions for rental properties that incorporate accessibility features alongside energy efficiency measures.
Laneway House vs. Garden Suite: What’s the Difference?
Vancouver’s R1-1 zoning framework introduced the term “garden suite” alongside the existing laneway house category. The two are frequently confused, and the distinction has real design implications.
Laneway House: Lane Access Required
A laneway house, as defined by the City of Vancouver, must be accessed from the lane at the rear of the lot. The structure is sited near the rear lot line, faces the lane, and the tenant’s primary entrance is from the lane. This creates natural separation between the laneway household and the principal dwelling household — one of the strongest selling points of the laneway format for both landlords and tenants.
Garden Suite: More Flexible Placement
A garden suite under R1-1 zoning does not require lane access. It can be sited mid-lot, facing the rear garden, with access from the principal dwelling’s yard. Garden suites offer more flexibility in lot placement — useful on irregular lots, lots without lane access, or situations where the homeowner wants the secondary unit closer to the main house for family use.
Garden suites have limitations: they must be on the same lot as the principal dwelling, they still require a separate entrance, and their placement mid-lot can reduce the private outdoor area available to both households. For most standard Vancouver lots with lane access, the laneway house format remains the cleaner solution — the physical separation from the main house is a genuine quality-of-life benefit that garden suites located near the main house cannot fully replicate.
Construction costs are comparable between the two formats. A garden suite may save marginally on lane setback engineering, while a laneway house may save on site access for construction equipment (lane access simplifies delivery logistics significantly).
Working With a Designer vs. a Design-Build Contractor
One of the first decisions you will make after deciding to build a laneway house is how to manage the design and permitting process. The three main paths each have genuine tradeoffs.
Architect or Designer Only
Hiring an architect or residential designer to produce drawings and manage permit submission costs $10,000–$25,000 for a laneway house, depending on the firm and the complexity of the project. You then take those drawings to market, solicit bids from general contractors, and manage the relationship between your designer and your builder yourself. This path gives you the most control and the most transparency on construction pricing — but it also gives you the most work. Design-build gaps (where the drawings don’t account for a construction reality) become your problem to manage.
Design-Build Contractor
A design-build firm like VGC handles design, engineering coordination, permit application, and construction under a single contract. The design and permitting cost is typically $15,000–$35,000, rolled into the total build price. The key advantage is single-point accountability: if the drawings say one thing and the construction requires something different, the contractor absorbs the redesign cost rather than sending you back to the designer for a change order. For most homeowners who are not experienced project managers, design-build reduces both stress and total project risk.
Prefab and Modular
Factory-built modular units delivered to site and set on a pre-poured foundation have been marketed heavily to Vancouver homeowners in recent years. Costs range from $150,000–$250,000 installed — a price point that sounds attractive until you add the foundation, site services connection, permit fees, and site preparation that are typically not included in the headline number. Build time is 8–12 weeks for the factory component, with site work adding 4–8 weeks. Design flexibility is limited; the units are typically pre-designed with minor customization. Quality varies significantly between manufacturers — do thorough due diligence before committing.
VGC’s approach: design-build with an in-house designer and a dedicated laneway construction crew. Having built 30+ laneway houses across Metro Vancouver, we have encountered virtually every site condition and regulatory scenario the City presents. Common design mistakes we prevent: undersized entry storage, north-facing living rooms without compensating light strategies, loft configurations that fail the BC Building Code ceiling height test, and lane presence designs that photograph poorly for rental listings.
If you are ready to discuss your lot and your goals, contact the VGC team for a no-obligation site assessment. We will tell you what your lot can support, what it will cost, and what rental income you can realistically expect.
Cost-Saving Design Decisions for Vancouver Laneways
Every laneway house budget has a ceiling. Here are the design decisions that genuinely reduce cost without sacrificing the features that drive rental income or longevity.
Eliminate the Garage (If You Qualify for the Transit Waiver)
This is the single largest cost lever available to Vancouver laneway builders. A garage — foundation, framing, concrete slab, roll-up door, and related structural work — costs $40,000–$80,000. If your lot is within 800 m of a frequent transit stop, the City will waive the parking requirement. Check the City’s online map before assuming you need a garage. On most Vancouver RS lots east of Granville and within a few blocks of a frequent bus route or SkyTrain station, the waiver applies. Redirecting that $40,000–$80,000 into living space quality or simply into your budget buffer is almost always the better financial decision.
Simplify the Roofline
A single-pitch shed roof or a simple gable is significantly cheaper to frame, sheathe, and finish than a hip roof, a complex multi-pitch design, or a roof with multiple valleys. Roofline complexity adds $8,000–$20,000 with no corresponding rental income benefit. The most popular laneway aesthetic (modern farmhouse) uses a simple gable or shed pitch — this is not a coincidence. The style was partly popularized because it costs less to build correctly.
Use Standard Window Sizes
Custom window sizes — any dimensions outside the standard catalogue sizes offered by major Canadian window manufacturers — add $500–$2,000 per window unit in fabrication time and lead time. A laneway house with 8–12 windows can add $4,000–$24,000 in window cost alone by specifying non-standard sizes. Design your window openings around the standard product catalogue. The visual difference is undetectable in the finished building.
Stack Wet Walls
Placing the bathroom directly above (in a loft plan) or directly adjacent to the kitchen — sharing a single wet wall — reduces plumbing rough-in costs by $3,000–$8,000. Every additional metre of drain line run through framing and foundation is labour and material cost. A bathroom at the far end of the suite from the kitchen is a plumber’s revenue opportunity and your cost problem.
Pre-Finished Exterior Materials
Cedar siding delivered pre-finished (factory-stained or factory-primed) eliminates site painting — a weather-dependent trade that causes schedule delays on Vancouver’s rain-heavy construction calendar. The material cost is slightly higher; the labour and schedule savings more than offset it. Pre-finished Hardie panel and engineered wood siding products also offer factory paint warranties that site-applied paint cannot match.
Choose Heat Pump Over Forced Air
A ductless mini-split heat pump requires no ductwork — no furnace, no sheet metal distribution system, no balancing, no bulkheads eating ceiling height. The total savings versus a comparable forced-air system are $8,000–$12,000. The heat pump also provides cooling (forced air systems in small suites typically don’t). The CleanBC rebate further improves the economics. There is almost no scenario in a Vancouver laneway where forced air makes more sense than a heat pump.
For a full overview of renovation financing strategies that apply to laneway house projects, including CMHC programs, home equity products, and municipal grants, see our Renovation Financing Guide.
Laneway House Rental Market Data (Vancouver 2026)
Rental income projections are the foundation of every laneway house financial model. These are current market rates observed in Metro Vancouver in 2026, based on active listings and completed lease agreements reported to REBGV and direct landlord data collected by VGC from clients with completed units.
| Unit Type | East Vancouver | Burnaby | North Vancouver |
|---|---|---|---|
| Studio (350–450 sq ft) | $1,600–$1,900/mo | $1,500–$1,800/mo | $1,800–$2,100/mo |
| 1-Bedroom (500–650 sq ft) | $2,100–$2,600/mo | $2,000–$2,400/mo | $2,300–$2,800/mo |
| 2-Bedroom / Loft (700–900 sq ft) | $2,800–$3,500/mo | $2,600–$3,200/mo | $3,000–$3,800/mo |
Why Laneways Command a Premium Over Basement Suites
Vancouver’s secondary rental market includes basement suites, laneway houses, and upper-floor suites in duplexes. Laneway houses consistently rent at a premium over equivalent-size basement suites in the same neighbourhood. The premium — typically 15–25% — is explained by four specific features that tenants cite consistently:
- Completely separate structure: No shared walls with the main house means no noise bleed from upstairs neighbours. Tenants pay for genuine acoustic privacy that a basement suite cannot provide.
- Private outdoor space: Even a small deck or patio that belongs exclusively to the laneway tenant — no shared yard with the main house — is a significant quality-of-life differentiator in Vancouver’s dense residential neighbourhoods.
- Natural light: A ground-level or above-grade laneway house receives substantially more natural light than a below-grade basement suite. In Vancouver’s grey winters, this is not a minor amenity.
- Pet-friendly reality: A laneway house with its own outdoor access makes pet ownership practical in a way that a basement suite rarely does. Pet-owning tenants — a large and generally reliable demographic in Vancouver — pay a significant premium for this feature and stay longer.
Using the rental data above: a two-bedroom loft in East Vancouver at $3,000–$3,200/month generates $36,000–$38,400 annually. At a total construction cost of $380,000 (mid-range for a two-bedroom loft), the gross rental yield is approximately 9.5–10.1% annually before operating costs — a compelling return on a real asset in one of Canada’s most expensive housing markets.
More Laneway Homes & Multiplexes Guides

Laneway House vs. Secondary Suite in Vancouver: Which is the Better Investment?

Prefab vs. Custom-Built Laneway House in Vancouver: Complete Comparison for 2026
Duplex vs. Secondary Suite in Vancouver: Which Maximizes Your Investment Return?
Strata vs. Rental for Your Vancouver Duplex: Which Makes More Financial Sense?
Garden Suite vs. Laneway House in Vancouver: Key Differences and Which to Choose
Ready to start your renovation?
Frequently Asked Questions: Laneway House Design in Vancouver
What is the maximum size of a laneway house in Vancouver?
The maximum floor area for a laneway house in Vancouver is 83.6 square metres (900 square feet), including any loft or above-garage space. This applies city-wide under the R1-1 zoning framework introduced in 2023. Some older zoning designations that have not been converted to R1-1 may have slightly different limits — confirm with the City’s planning counter for your specific address.
Can I have a two-storey laneway house in Vancouver?
Not a full two-storey structure in the traditional sense. Vancouver’s laneway regulations allow a maximum height of 6.0 m for a single-storey design or 6.7 m if a loft is incorporated. A loft is considered a partial second storey — it must meet BC Building Code minimum ceiling height requirements over the majority of its area, but it does not constitute a full second floor. The practical result is a one-bedroom-plus-loft configuration that can approach the 900 sq ft maximum.
What is the best floor plan for a laneway house?
The best floor plan depends on your goal. For maximum rental income: a two-bedroom loft plan, which commands the highest rents and attracts the widest tenant pool. For the best value per dollar of construction cost: a well-designed one-bedroom at 600 sq ft with a covered deck. For the lowest entry cost with immediate rental income: a studio with a murphy bed. VGC recommends starting with the one-bedroom as a baseline unless your lot, budget, or specific circumstances point toward a different configuration.
How do I maximize space in a laneway house?
The five highest-impact strategies: (1) 9-foot ceilings — transforms how a small space feels and photographs; (2) open-plan main floor — no interior walls except around the bathroom and bedroom; (3) built-in storage throughout — stairs, entry bench, floor-to-ceiling kitchen cabinets; (4) murphy bed in studios or small one-bedrooms; (5) covered outdoor space — a 6 ft × 10 ft covered deck effectively adds a room for 10 months of the Vancouver year.
Do I need a garage in my laneway house?
Only if your lot is not within 800 metres of a frequent transit stop. A large proportion of Vancouver lots — particularly in the east side, near SkyTrain corridors, and along frequent bus routes — qualify for the City’s parking waiver. Verify your lot’s eligibility using the City of Vancouver’s online transit map tool before assuming a garage is required. Eliminating the garage saves $40,000–$80,000 in construction cost and allows the full footprint to be used for living space.
What is the best heating system for a Vancouver laneway house?
A ductless mini-split heat pump, without exception. It heats and cools, requires no ductwork, qualifies for CleanBC rebates of up to $4,000, and costs $4,500–$9,000 installed. The alternative — electric baseboard heating — is dramatically more expensive to operate and provides no cooling. Gas forced-air systems require ductwork that consumes ceiling height and costs $8,000–$12,000 more than the ductless system. Heat pump is the unanimous industry standard for new Vancouver laneways.
Should I do design-build or hire a designer separately?
Design-build is the right choice for most homeowners building a laneway house. The primary advantage is single-point accountability — when a discrepancy between drawings and construction reality emerges (it always does), the design-build contractor resolves it internally rather than billing you for a change order. Hiring a designer separately makes sense if you have strong project management experience, want maximum control over contractor selection, or are working with a specific architect whose work you value. For a straightforward laneway house, design-build is more efficient and typically results in fewer surprises.
What exterior style is most popular for Vancouver laneways?
Modern farmhouse — board and batten siding, black window frames, clean gable roofline, and a covered entry — is the dominant style in Metro Vancouver laneway construction from 2023 through 2026. It is popular because it looks sharp in rental listing photos, ages well with minimal maintenance, and works on a wide range of lot contexts. West Coast modern (cedar and corrugated metal) is a strong second choice, particularly on the North Shore.
Can I rent my laneway house on Airbnb?
Under Vancouver’s short-term rental bylaws, short-term rentals (fewer than 30 consecutive days) are only permitted in a host’s principal residence or one additional unit at the same address if the host lives on-site. If you live in the main house and rent the laneway on Airbnb, this may be permissible with a valid short-term rental business licence. However, regulations have changed repeatedly and enforcement has increased — verify current City of Vancouver short-term rental rules before relying on Airbnb income in your financial model.
How long does it take to build a laneway house?
Total timeline from first design consultation to final occupancy permit typically runs 12–18 months. The breakdown: 1–2 months for design and drawing preparation; 3–6 months for permit review (Vancouver’s Development Permit and Building Permit processes); 4–6 months for construction; 1–2 months for inspections and occupancy permit. Permit timelines are the most variable element and the most common source of project delay — engage a builder or designer with active City relationships who can anticipate reviewer questions before resubmission.
What is a garden suite vs. a laneway house?
Both are secondary dwelling units permitted under Vancouver’s R1-1 zoning, but they differ in siting requirements. A laneway house must be accessed from the lane at the rear of the lot — it faces the lane. A garden suite does not require lane access and can be placed mid-lot, facing the main house’s rear yard or in another configuration. For lots with lane access, the laneway house format is typically preferred because the physical separation from the main house is greater. Garden suites are useful on lots without lane access or where mid-lot placement better suits the homeowner’s family arrangement.
How do I make a north-facing laneway house feel bright?
Four strategies work reliably in Vancouver laneways: (1) Add a skylight over the kitchen or living area — a single fixed skylight delivers more light than an extra north-facing window; (2) Use clerestory windows on the east or west gable end for morning or afternoon light; (3) Place windows on the south-facing wall (toward the main house) to capture direct sunlight and allow it to penetrate the open-plan interior; (4) Use light-reflecting finishes — white ceiling, light hardwood or LVP flooring, minimal window treatments. A north-facing suite designed around these principles will feel brighter than a poorly designed south-facing suite.
What is a murphy bed and is it worth it in a laneway suite?
A murphy bed (also called a wall bed) folds up into a wall cabinet when not in use, freeing the floor area for daytime use. In a studio or small one-bedroom laneway suite, a quality murphy bed with integrated shelving and a fold-down desk costs $3,000–$6,000 installed. It is absolutely worth it in a studio, and strongly worth considering in a small one-bedroom. Vancouver tenants are very accustomed to this configuration — it appears on rental listings as a feature, not a compromise, and is associated with higher-quality small suites.
Do I need a separate electrical meter for my laneway house?
Yes. BC Hydro and the City of Vancouver require a separate electrical meter for any secondary dwelling unit that is rented to a tenant. This applies whether the unit is a laneway house, a garden suite, or a basement suite. A separate meter protects both you and your tenant — there is no dispute about who owes what on the electricity bill. Electrical service installation including the separate meter runs $6,000–$12,000 depending on distance from the utility connection and service size (100 amp vs. 200 amp).
What is the best foundation for a Vancouver laneway house?
A crawl space foundation for most laneway houses. It costs $8,000–$18,000 more than a concrete slab and provides access to plumbing and mechanical systems for future repairs — a significant practical advantage given that the laneway house will likely have multiple tenants over a 30–50 year lifespan. The first time a plumber needs to access a drain line under a slab foundation, the cost of breaking and patching concrete will exceed the crawl space premium. Slab is appropriate for above-garage configurations where it is structurally required and for budget-constrained projects where the lowest possible upfront cost is the priority.
Ready to Design Your Vancouver Laneway House?
VGC has designed and built laneway houses across East Vancouver, Burnaby, North Vancouver, and the broader Metro area. We have seen what works — and what looks good on a drawing board but fails in the real world of Vancouver’s wet climate, tight lots, and demanding permit process.
If you are ready to move from research to action, contact the VGC team to schedule a site assessment. We will review your lot, confirm your zoning and parking waiver eligibility, discuss which floor plan best matches your goals, and provide a preliminary cost estimate — at no obligation. We also offer full laneway house design-build services from concept through occupancy permit, and our home renovation services can address the main house at the same time for coordinated design and schedule efficiency.
The best laneway house is the one that gets built. Get the design right first — it costs far less to redesign on paper than to discover a layout mistake after the concrete is poured.
Get a Free Renovation Quote
Metro Vancouver’s trusted general contractors. Free consultations across Vancouver, Burnaby, Richmond, North Shore & beyond.
Get Your Free Quote →VGC serves Vancouver and surrounding areas. View all renovation services in Vancouver →
Comments are closed