
Small Bathroom Renovation Vancouver: Costs, Layout Ideas & Space-Saving Solutions (2026)
Most Vancouver homeowners discovering they need a bathroom renovation face the same unwelcome surprise: their 4×8 or 5×8 bathroom costs nearly as much to renovate as a space twice its size. If you’re planning a small bathroom renovation in Vancouver, this guide covers everything you need to know — real costs, layout strategies that actually work, tile and fixture choices, permit requirements, and how to get the most livable result out of 35–50 square feet.
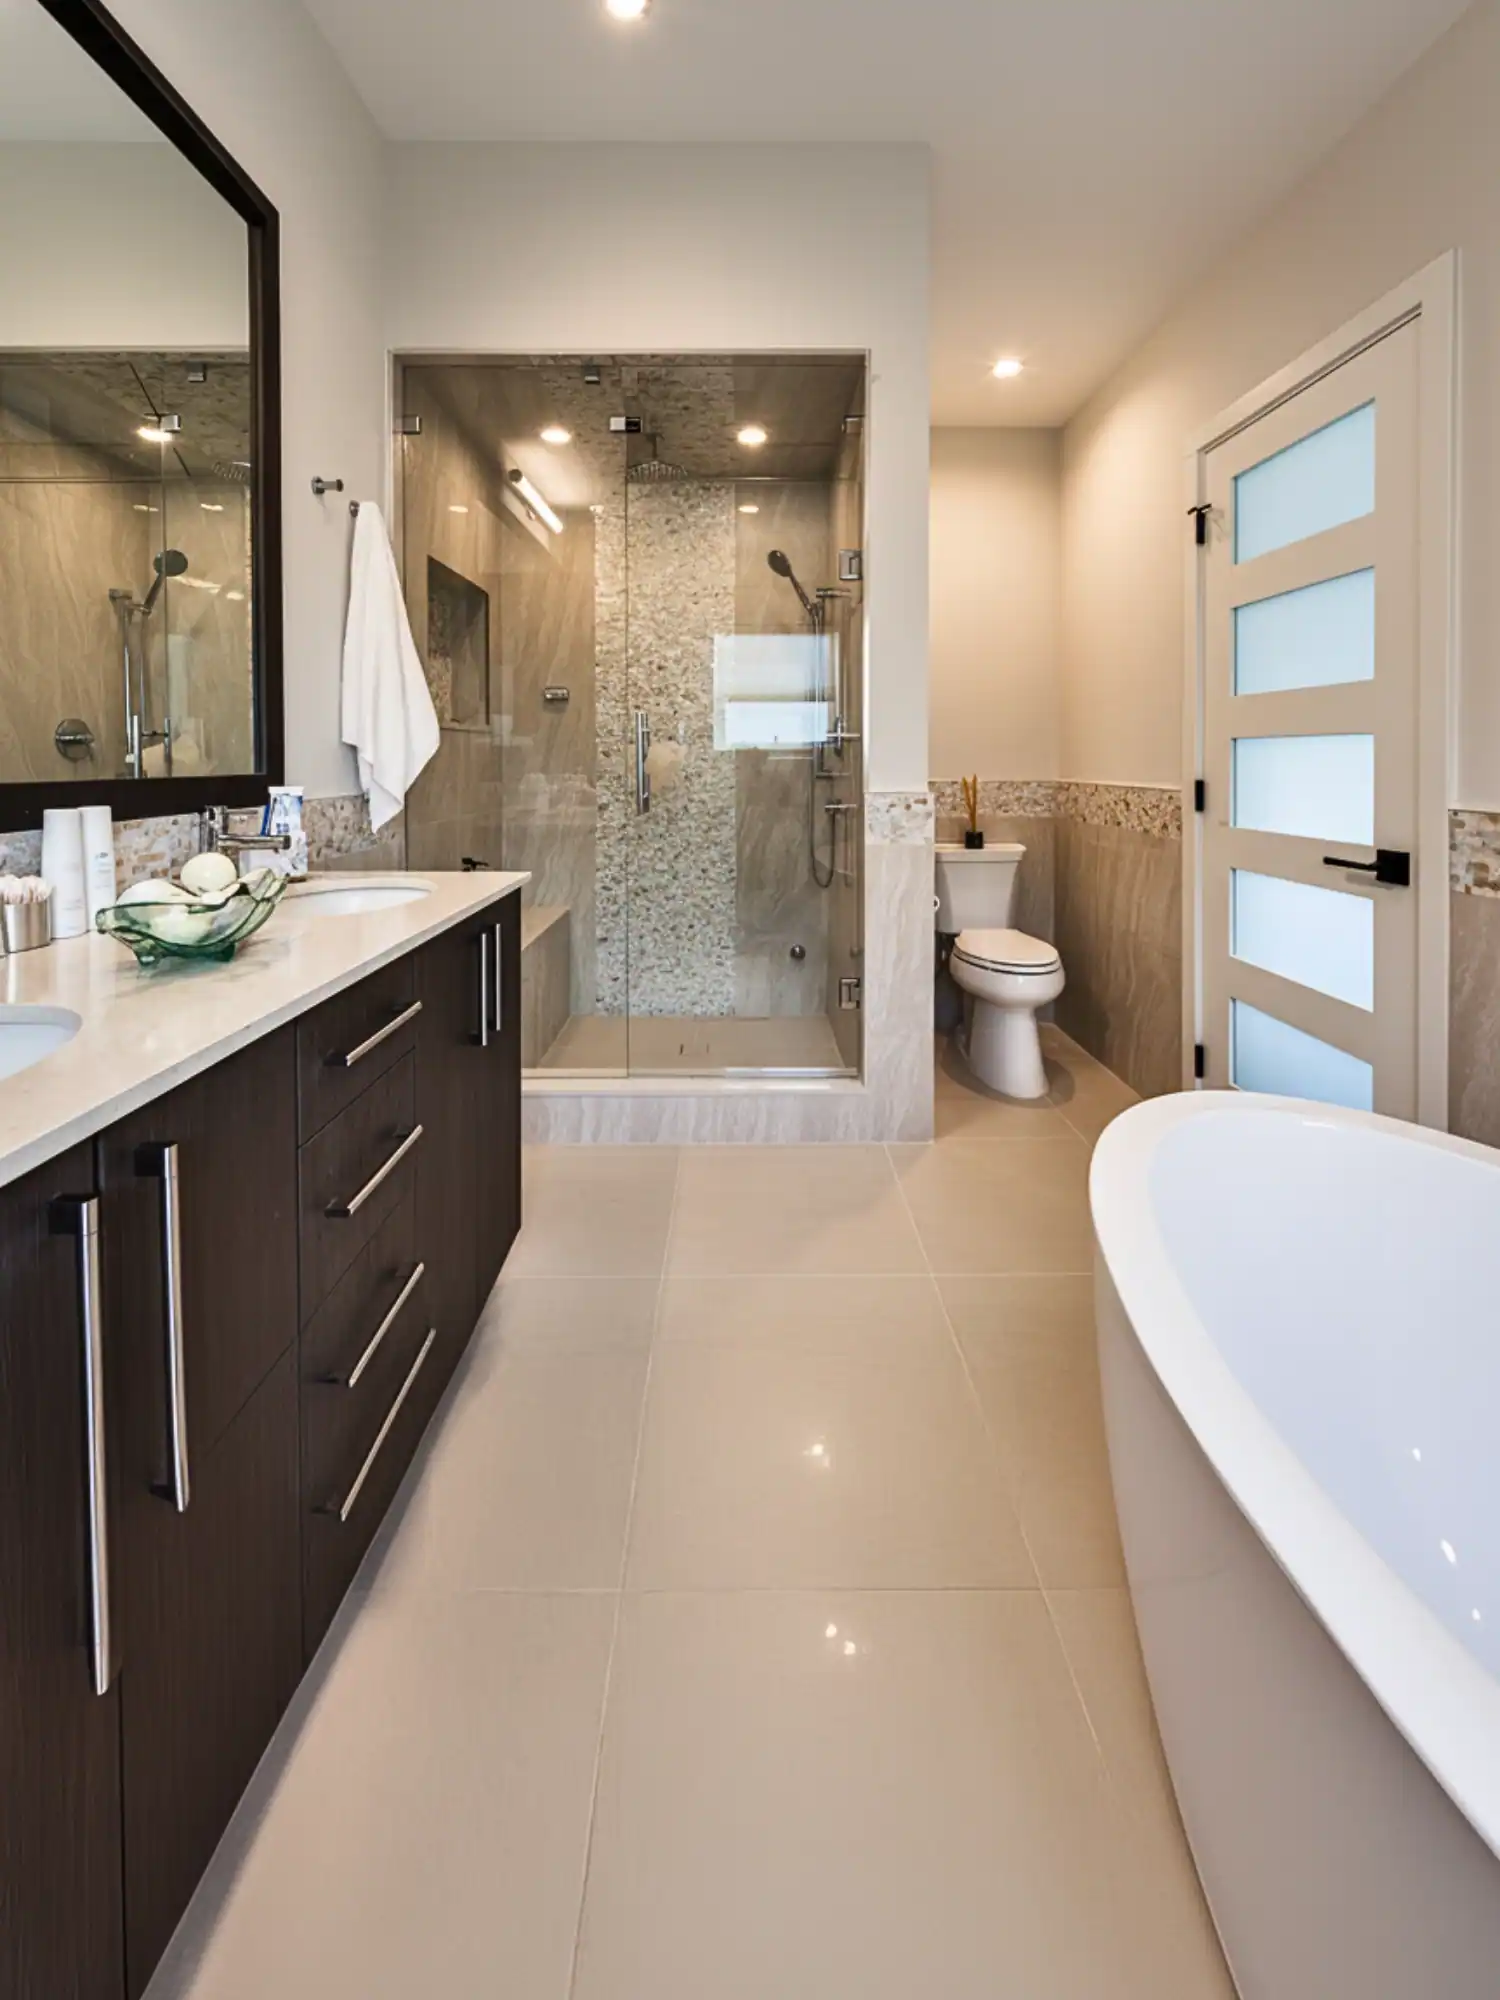
The Vancouver Small Bathroom Reality
Vancouver’s housing stock tells a consistent story. Homes built before 1990 — and that’s the majority of detached homes in East Vancouver, Burnaby, New Westminster, and the West Side — typically have at least one bathroom measuring 4×8 feet (32 sq ft) or 5×8 feet (40 sq ft). These bathrooms were designed in an era when a toilet, a tub, and a single vanity were considered sufficient. Ventilation meant a window. Storage wasn’t part of the equation.
Fifty years later, those same bathrooms are showing their age. Fibreglass tub surrounds crack and yellow. Vinyl sheet flooring curls at the edges. Vanities made from particleboard swell and delaminate. The 4-inch exhaust fan that was installed in 1978 runs continuously just to keep the mirror from fogging.
The reason is simple: the fixed costs don't scale with size. A licensed plumber charges the same day rate whether your bathroom is 35 sq ft or 100 sq ft
Vancouver General Contractors
Here’s what surprises most homeowners: small doesn’t mean cheap. A complete gut renovation of a 40 sq ft bathroom in Vancouver typically runs $18,000–$32,000 for a mid-range finish. High-end finishes push that to $28,000–$45,000. That’s $450–$800 per square foot — far more than the $200–$300 per square foot you’d expect on a larger bathroom or kitchen renovation.
The reason is simple: the fixed costs don’t scale with size. A licensed plumber charges the same day rate whether your bathroom is 35 sq ft or 100 sq ft. An electrician pulling permits for a GFCI outlet and exhaust fan circuit doesn’t work faster in a small space — in fact, working in a tight bathroom is physically harder and slower. Tile labour in small rooms costs more per square foot because cutting, fitting, and grouting around fixtures takes the same time regardless of total area.
Understanding this from the outset sets realistic expectations. A small bathroom renovation is not a weekend project, not a DIY project for most homeowners, and not something to budget lightly. Done well, it transforms one of the most-used rooms in your home and adds measurable value to your property. Done poorly or on the cheap, you’ll be looking at the same problems — plus new ones — within five years.
Small Bathroom Renovation Costs in Vancouver (2026)
Costs below reflect Vancouver and Lower Mainland pricing in 2026, including labour, materials, permits, and GST. They assume a standard 35–50 sq ft bathroom with existing plumbing in place and no major structural surprises (no rot, no asbestos abatement required).
| Renovation Level | What’s Included | Typical Cost Range |
|---|---|---|
| Basic Refresh | New vanity, toilet, faucet, mirror, paint, accessories. Existing tile kept or partially replaced. No plumbing relocation. | $8,000–$14,000 |
| Mid-Range Reno | Full gut: new tile throughout, new tub or shower, new vanity, toilet, fixtures, exhaust fan, lighting. Plumbing connections updated but no relocation. | $18,000–$28,000 |
| High-End Reno | Wet room or custom tile shower, frameless glass enclosure, wall-hung toilet, floating vanity, designer tile, heated floor, backlit mirror, full plumbing and electrical upgrade. | $28,000–$45,000 |
| Plumbing Relocation Add-On | Moving toilet, shower, or tub drain to a new location within the bathroom. | $2,500–$6,000 |
| Heated Floor Add-On | Electric in-floor heat mat under tile, including thermostat and electrical permit. | $1,200–$2,500 |
| Frameless Glass Enclosure | Custom frameless shower glass panel or enclosure, tempered safety glass, chrome or matte black hardware. | $1,800–$3,500 |
| Asbestos Abatement (if found) | Required if pre-1990 floor tile or drywall compound tests positive. Certified abatement contractor. | $1,500–$4,000 |
What Drives Cost Up in Small Spaces
Tile labour is the single biggest cost driver. In a 40 sq ft bathroom with full floor-to-ceiling tile, you may have 180–220 sq ft of tile surface once you account for walls, floor, and a tub surround or shower. With cuts around every fixture, corner trim pieces, and the physical challenge of working in a cramped space, a tile installer’s rate of $12–$18 per sq ft for labour applies to every square foot of that surface. Labour alone on the tile can reach $2,500–$4,000.
Plumbing rough-in access is harder in a small bathroom. There is less room to work, and often less flexibility about where pipes can run. If your bathroom sits on the second floor of a 1960s bungalow, opening the ceiling below to access drain lines is frequently the only option.
Fixture selection matters more in a small space. Compact fixtures — wall-hung toilets, 18″ vanities, corner showers — often cost more than standard-sized equivalents. You’re paying a premium for engineering and design work that goes into making something functional at a reduced footprint.
One-bathroom homes, common in Vancouver bungalows, add a practical cost: you may need to budget for a temporary toilet rental or schedule the renovation in phases so the bathroom is usable at night.
Layout Options for Small Vancouver Bathrooms
Layout is the first and most consequential decision in a small bathroom renovation. Before you choose tile or fixtures, you need to decide what configuration serves your household and fits the physical constraints of the space.
3-Piece vs. 4-Piece Layouts
A 3-piece bathroom has a toilet, sink, and shower (no tub). A 4-piece has a toilet, sink, tub, and separate shower — or a tub/shower combination. In most Vancouver small bathrooms, you’re choosing between keeping the tub or replacing it with a shower.
For households without young children, removing the tub and converting to a shower-only layout is almost always the right call. A standard 5-foot bathtub occupies 15 sq ft of floor space. Replace it with a 36″×36″ corner shower and you reclaim roughly 9 sq ft — in a 40 sq ft bathroom, that’s nearly a quarter of the total space. The resulting room feels dramatically larger, and a well-designed tile shower is significantly easier to clean than a tub surround.
The caveat: if this is your home’s only bathroom and you have young children or plan to sell within a few years, retaining a tub is often the practical choice. Many buyers with young families specifically look for at least one tub in the home, and Vancouver real estate agents will generally tell you that removing the last tub from a family home can affect resale value.
The Wet Room Concept
A wet room is a fully waterproofed bathroom where the shower area is open to the rest of the space — no glass enclosure, no threshold, no shower pan. The entire floor is tiled and sloped to a central or linear drain. It’s a design approach common in European and Scandinavian bathrooms that works exceptionally well in small Vancouver bathrooms for several reasons:
- No shower enclosure to clean or replace
- No threshold to step over (ideal for aging-in-place or accessible bathrooms)
- The visual openness makes the room feel larger
- Floor-to-ceiling tile creates a coherent, high-end aesthetic
- Eliminates the need for a shower door or curtain
The additional cost is in waterproofing: a proper wet room requires a full waterproofing membrane (Schluter Kerdi, Wedi board, or equivalent) on all walls and floors, a linear drain rated for the flow, and a carefully planned slope. Expect to add $1,500–$3,000 to your tiling budget for a proper wet room waterproofing system. Done right, a wet room will outlast a framed shower enclosure by decades.
Pocket Doors and Space-Saving Entries
A standard swing door into a small bathroom requires roughly 6–8 sq ft of clearance arc. In a 40 sq ft bathroom, that’s 15–20% of your floor space dedicated to a door swing. A pocket door — one that slides into the wall cavity — eliminates this entirely. Installation cost for a pocket door kit and framing is $600–$1,200, and the payoff in usable floor space and improved traffic flow is significant.
Barn-style sliding doors are a lower-cost alternative ($400–$800 installed) but require wall space beside the door frame for the door to slide along — which may not be available in all small bathroom configurations.
Tile Selection for Small Bathrooms
Tile choice has a dramatic impact on how large a small bathroom feels. The goal is typically to maximize the sense of space while choosing materials that are practical for a wet environment.
Large-Format Tile and the Visual Expansion Effect
Counter-intuitively, large-format tiles make small bathrooms feel bigger. The logic is grout lines: a bathroom floor covered in 4×4 mosaic tile has dozens of grout lines interrupting the surface, breaking the floor into small visual units. A floor covered in 24×24 or even 12×24 tile has far fewer grout lines, letting the eye travel across the surface uninterrupted. The same effect applies to walls.
Popular tile sizes for small Vancouver bathrooms:
- 12×24 inch: The workhorse of small bathroom renovations. Large enough to minimize grout lines, small enough to cut efficiently in tight spaces. Works well on both floors and walls.
- 24×24 inch: Creates a seamless, expansive look. Works best on floors; requires more careful planning around fixtures on walls.
- 48×16 or 48×24 inch large planks: A high-end look that works well in wet rooms. Requires very flat substrate and experienced tile setters.
- 3×12 or 4×12 subway in vertical stack: Draws the eye upward, making ceilings feel higher.
Tile Price Ranges and Local Suppliers
| Tile Tier | Price Range (Supply Only) | What You Get |
|---|---|---|
| Entry-level porcelain | $3–$6/sq ft | Standard porcelain in neutral tones. Good durability, limited colour options. |
| Mid-range porcelain/ceramic | $6–$12/sq ft | Wider format options, better surface finishes, wood-look and stone-look options. |
| Designer porcelain and natural stone | $12–$35/sq ft | Large-format slabs, genuine marble, travertine, textured feature tiles. Requires sealing for natural stone. |
| Specialty and handmade | $35–$80+/sq ft | Handmade ceramic, encaustic cement tile, custom patterned tile. |
For a 40 sq ft bathroom with a full tile package (floor, walls, and shower/tub surround), budget $800–$2,500 for mid-range tile supply and $2,500–$4,000 for tile labour. Natural stone or large-format slab tile increases both numbers significantly.
Continuity From Floor to Wall
One of the most effective design techniques in small bathrooms is running the same tile from the floor up the walls — or at minimum, coordinating them closely in tone and format. This removes the visual boundary between floor and wall, making the room feel taller and more continuous. The same tile in a floor and wall installation is also simpler to price and order (one SKU, one delivery, one grout colour).
Storage Solutions in Small Vancouver Bathrooms
Storage is where small bathroom renovations either succeed or fail. Every square foot of floor space is precious, which means storage has to go up, into walls, or under the vanity. Here are the options that work in real Vancouver small bathrooms.
Recessed Tile Niches
A recessed niche is built into the wall between studs — typically 14.5″ wide (one stud bay) and however tall you want it. Because it sits flush with the wall, it takes zero floor space and provides a clean, built-in look. In a shower or tub surround, a recessed niche holds shampoo, soap, and razors without a wire rack screwed to the tile.
The catch: in exterior walls (common in Vancouver bungalows where the bathroom is often on an exterior corner), cutting into the stud bay compromises insulation and can create moisture problems. Niches are best placed on interior walls. Cost installed with tile to match: $800–$1,500 per niche, depending on size and tile complexity.
Floating Vanities
A wall-mounted floating vanity does two things: it creates the illusion of more floor space (the eye sees floor all the way to the wall), and it allows you to set the height for your specific household. Standard vanity height is 32″–34″, but many homeowners opt for 36″–38″ (“comfort height”) which reduces back strain during daily use.
In terms of storage, floating vanities with drawers (rather than doors and a single shelf) make far better use of the cabinet interior. Drawer organizers keep toiletries accessible without the “dig-to-the-back-of-the-cabinet” frustration of door-style cabinets. In an 18″–24″ deep vanity, drawers are particularly practical.
Medicine Cabinets and Mirror Cabinets
A recessed medicine cabinet — one that mounts into the wall cavity rather than projecting from it — provides 3–4 inches of depth across the full width of the mirror. In a 24″–30″ wide installation, that’s a meaningful amount of storage for daily-use items. Surface-mounted mirror cabinets project 3–5 inches from the wall and can feel bulky in a small space; recessed is almost always preferable if the wall allows it.
Backlit mirror cabinets — which provide both storage and vanity lighting in a single unit — are an increasingly popular choice in Vancouver renovations. Brands like Robern, Kohler, and various Italian manufacturers offer recessed backlit mirror cabinets in the $400–$1,800 range.
Over-Toilet Storage
The space above the toilet — typically 28″–30″ of clearance between the tank top and the ceiling — is often unused real estate. A custom-built open shelf or enclosed cabinet above the toilet can store towels, toiletries, and cleaning supplies without encroaching on any of the usable floor space. Custom built-in to match your vanity: $600–$1,200. IKEA-style modular units: $150–$400.
Shower Options for Tight Spaces
The shower is often the centrepiece of a small bathroom renovation. Choosing the right shower format — and the right enclosure — can make or break the final result.
Minimum and Ideal Shower Dimensions
The BC Building Code sets the minimum shower enclosure at 900mm × 900mm (36″×36″). Some contractors will quote a 32″×32″ (800mm×800mm) shower — and while prefab units in that size exist, they are genuinely uncomfortable for most adults and do not meet BC Code requirements for a shower used as the primary bathing facility.
Our recommendation: 36″×36″ is the absolute minimum for a functional shower. If you can squeeze 36″×48″ or 36″×60″ into your layout, do it. The additional space makes a shower dramatically more comfortable — you can shave, wash your hair, and turn around without touching the walls.
Corner Showers
A corner shower — positioned in one corner of the bathroom with two glass panels and two tiled walls — is the most space-efficient layout for a small bathroom. It uses corner space that would otherwise be awkward and allows the rest of the bathroom to function normally. Corner showers work well in a 5×8 bathroom when the toilet and vanity occupy the opposite walls.
Walk-In Doorless Showers
A doorless walk-in shower eliminates the shower door entirely. The opening faces a wall or corner such that water spray doesn’t reach the rest of the bathroom, relying on a fixed glass panel (or no panel at all in a wet room design) to contain splash. These designs feel open and luxurious even in small spaces, and they eliminate the maintenance headache of shower door seals, hinges, and tracks.
The trade-off is layout: a doorless shower needs a larger opening (at least 24″–30″ of open access) and requires the shower head and controls to be positioned away from the opening so you’re not reaching through cold air to start the water. This takes planning but is very achievable in a 5×8 bathroom.
Prefab vs. Custom Tile Showers
| Option | Cost Range | Pros | Cons |
|---|---|---|---|
| Prefab fibreglass/acrylic unit | $400–$1,200 (supply) | Fast installation, factory-sealed, no grout to maintain | Limited sizes, dated look, can’t customize |
| Prefab acrylic surround panels | $600–$1,800 (supply) | Better aesthetics than fibreglass, no grout | Seams visible, limited design options |
| Custom tile shower | $3,500–$8,000 (supply + labour) | Any size, any tile, seamless with bathroom design | Grout maintenance, longer installation time |
| Wet room (full tile, no enclosure) | $4,500–$10,000 (supply + labour) | Maximum design flexibility, no enclosure to maintain | Full waterproofing required, linear drain cost |
For a renovation where you’re already spending $18,000–$32,000, the prefab fibreglass unit makes little aesthetic sense. A custom tile shower in the $4,000–$6,000 range is almost always the right choice — it lasts longer, looks better, and gives you full control over dimensions.
Frameless Glass Enclosures
A frameless glass enclosure uses thick (3/8″ or 1/2″) tempered safety glass with minimal hardware — no aluminium frame around the perimeter. The result is a clean, contemporary look that doesn’t visually chop up the small space the way a framed enclosure does. Cost for a custom frameless enclosure for a 36″×36″ corner shower: $1,800–$3,500, depending on glass thickness, hardware finish, and whether you need a door (hinged or sliding) or just a fixed panel.
Fixtures and Fittings for Small Bathrooms
Fixture selection in a small bathroom is where you recover space — sometimes 5–8 inches in critical dimensions — without compromising function. These are the choices that matter most.
Wall-Hung Toilets
A wall-hung toilet has no floor-standing base. The tank is concealed inside the wall (in a carrier frame), and only the bowl projects from the wall. The result: the toilet projects 12″–14″ from the wall rather than the standard 26″–28″ of a floor-mounted toilet. In a small bathroom where every inch of floor clearance matters, recovering 12–14 inches of projection depth is significant.
The additional benefits: the floor is completely clear underneath, making it far easier to clean; the concealed tank is quieter; and the carrier frame allows you to set the bowl height anywhere from 15″ to 19″ from the floor. Cost installed (including carrier frame, wall modification, bowl, and flush plate): $1,200–$2,200. This is substantially more than a floor-mounted toilet ($400–$800 installed), but in a 4×8 bathroom, the space recovery often justifies it.
Compact and Floating Vanities
Standard bathroom vanities are 21″ deep. In a small bathroom, moving to an 18″ or even 16″ depth vanity can meaningfully improve circulation. The trade-off is slightly less counter space and shallower sink bowl options. For a second bathroom used primarily for hand-washing, an 18″ vanity is perfectly practical. For a primary bathroom used daily for grooming, 21″ remains more comfortable.
Floating (wall-mounted) vanities are available in 18″–48″ widths. For small bathrooms, 18″–24″ wide units are most common. Budget $400–$800 for a mid-range floating vanity (supply only) and $300–$600 for installation including wall blocking, mounting, and plumbing connection.
Sink Options
- Undermount: Mounts below the countertop for a clean look. Requires a solid surface counter (stone, quartz, solid surface). Most popular for small bathroom vanities. $150–$400 for a compact undermount basin.
- Vessel (above-counter): Sits on top of the counter. Can look striking but adds 4–6″ of height to the vanity, which can feel crowded in a small space with a medicine cabinet or mirror above.
- Integrated: Sink and countertop cast as one piece. Easiest to keep clean (no caulk seam to mould). Available in ceramic, solid surface, and concrete. $300–$900.
- Wall-hung (pedestal alternative): Mounts directly to the wall with no vanity cabinet below. Saves floor space but provides zero storage. Best for secondary bathrooms where storage is addressed elsewhere.
Faucets and Shower Fixtures
For small vanities, single-handle faucets take up less counter real estate than widespread two-handle faucets. Wall-mounted faucets (where the spout comes from the wall rather than the sink deck) are a dramatic space-saving option for pedestal or vessel sinks — they keep the sink area clear and look very clean. Budget $150–$500 for a quality single-handle or wall-mount faucet from Moen, Kohler, or Delta.
For shower fixtures, a thermostatic valve with separate volume control costs more ($600–$1,500 for the valve alone) but allows you to set a preferred temperature that the shower maintains precisely — no scalding adjustments when someone flushes a toilet elsewhere in the house. In a renovation where you’re retiling anyway, this is an upgrade worth considering.
Lighting in Small Bathrooms
Lighting is consistently under-budgeted in bathroom renovations. A single overhead fixture is not sufficient for a bathroom used for grooming. Small bathrooms need layered lighting — ambient, task, and ideally accent — to function well and feel larger than they are.
Vanity Lighting
The most important lighting in any bathroom is the vanity light. Side-mounted vanity lights (sconces on either side of the mirror at face height, approximately 60″–65″ from the floor) provide the most flattering and shadow-free task lighting for grooming. A single bar fixture above the mirror creates shadows under the chin and brow — workable, but not ideal.
Backlit and LED-illuminated mirrors are an increasingly popular solution for small bathrooms. A 24″×36″ backlit mirror provides diffused ambient light around the face, eliminating shadows, while also functioning as the primary vanity mirror. Combined with a recessed pot light for general illumination, this two-fixture approach covers both task and ambient needs efficiently. Budget $200–$800 for a quality backlit mirror.
Recessed Pot Lights
Recessed pot lights flush with the ceiling keep a low ceiling from feeling even lower. In a small bathroom, two 4″ pot lights provide general illumination without projecting into the room. Critical requirement: all recessed lights in a bathroom must be IC-rated (insulation contact) and rated for wet or damp locations, depending on their proximity to the shower. BC’s electrical code requires a wet-rated fixture within the shower zone (within 3 feet of the shower head) and damp-rated elsewhere in the bathroom.
Electrical Permit Requirements in BC
Any new circuit, relocated outlet, or new fixture requiring a new circuit in a BC bathroom requires an electrical permit from BC Safety Authority (BCSA). This includes adding pot lights, installing a heated floor thermostat, or adding a GFCI outlet. An electrician pulling the permit typically charges $150–$300 for the permit itself plus their labour. Inspection is required after rough-in and after completion. Plan for this in your budget: $800–$2,500 for a complete bathroom electrical upgrade including heated floor circuit, lighting, and GFCI outlets.
Ventilation Requirements for Vancouver Bathrooms
Ventilation is one of the most neglected aspects of bathroom renovation planning — and one of the most consequential for the long-term health of your renovation. Inadequate ventilation in a Vancouver bathroom leads to persistent moisture, mould in grout and caulk, peeling paint, and eventually water damage to the wall structure. Get this right during the renovation, when walls are open and duct runs are accessible.
BC Building Code Requirements
The BC Building Code requires mechanical ventilation in bathrooms without operable windows. For bathrooms under 10 m² (roughly 108 sq ft), the minimum exhaust rate is 50 CFM (cubic feet per minute) continuous or 25 CFM when combined with an intermittent rate of 100 CFM triggered by occupancy. For windowless bathrooms in Vancouver’s wet climate, we recommend minimum 80–100 CFM regardless of code minimums.
Fan Options
The Panasonic WhisperCeiling series (FV-0811VF1 at 80 CFM, FV-1115VF1 at 110 CFM) is the standard recommendation for quality bathroom ventilation in BC. These fans are exceptionally quiet (0.3–1.0 sone), highly efficient, and backed by a 3-year warranty. Unlike standard builder-grade fans that run loudly and are often turned off precisely because of the noise, a quiet fan gets used consistently — which is the whole point. Cost installed: $300–$600 for the Panasonic unit; add $200–$400 for duct run to exterior if existing duct is inadequate or needs to be rerouted.
For homes with an HRV (Heat Recovery Ventilator) system — more common in newer Vancouver homes and renovated Passive House projects — the bathroom exhaust can be integrated into the HRV system. This captures heat from exhaust air and transfers it to incoming fresh air, recovering 70–80% of the heat that would otherwise be lost. Your HVAC contractor or HRV installer can advise on whether your existing HRV capacity can accommodate an additional bathroom exhaust port.
Duct the exhaust to the exterior — never into an attic or soffit. Moisture-laden bathroom air exhausted into an attic is a leading cause of attic mould in Vancouver homes. The duct run should be as short and straight as possible, with a maximum of two 90-degree bends before the exterior termination cap.
Permit Requirements for Bathroom Renovation in Vancouver
Permits are not optional, and they are not just bureaucratic formalities. They protect you as a homeowner — unpermitted plumbing and electrical work can void your insurance coverage and become a significant liability when you sell. Here is what you need to know about permits for a Vancouver bathroom renovation.
When a Building Permit Is Required
A City of Vancouver building permit is required when your renovation involves:
- Any structural work (moving a wall, enlarging the bathroom footprint)
- Plumbing work that involves moving drain lines or vent stacks
- Converting a space that was not previously a bathroom
A straight like-for-like replacement of fixtures (toilet for toilet, tub for tub) in the same location does not require a building permit from the City. However:
When a Plumbing Permit Is Required
A plumbing permit (from the City of Vancouver) is required when:
- Any drain or vent piping is altered or relocated
- New plumbing fixtures are added
- The shower pan drain is relocated
- Supply lines are rerouted
A licensed plumber must do the work and pull the permit. Homeowners can apply for a homeowner permit in certain cases, but the inspection requirements are identical. The City of Vancouver’s Development, Buildings and Licensing department processes plumbing permits; turnaround for straightforward bathroom plumbing permits is typically 1–3 business days for online submissions.
Electrical Permit (BC Safety Authority)
As noted above, any new electrical circuit — for lighting, heated floor, or a new outlet — requires a BC Safety Authority (BCSA) electrical permit. This is separate from the City of Vancouver building permit process. A licensed electrician will handle the permit application and required inspections. Rough-in inspection (before walls are closed) and final inspection (after completion) are standard.
Inspection Sequence
For a bathroom with both plumbing and electrical permits, the inspection sequence is typically:
- Plumbing rough-in inspection: After new drain and vent piping is installed, before walls are closed.
- Electrical rough-in inspection: After wiring is run, before walls are closed. Can often be scheduled on the same day as the plumbing rough-in.
- Plumbing final inspection: After fixtures are installed and connected.
- Electrical final inspection: After all fixtures and devices are installed.
Your contractor should coordinate inspections — failed inspections that require re-inspection add time to your project. A well-run renovation with experienced trades rarely fails inspection.
Need help navigating the permit process? Our free renovation guide walks through the full permit and planning process for Vancouver home renovations.
Planning Your Small Bathroom Renovation
A bathroom renovation has a fixed sequence of trades, and each phase depends on the previous one being complete and inspected. Understanding this sequence helps you plan realistically and avoid delays.
The Renovation Sequence
- Week 1 — Demo and rough-in: Demolition of existing tile, fixtures, and drywall. Plumbing rough-in (new drain locations, supply lines). Electrical rough-in (new circuits, outlet locations, exhaust fan duct). Inspections at end of week 1.
- Week 2 — Substrate and waterproofing: Cement board or Schluter panel installation on walls and floor. Waterproofing membrane application. Shower pan or linear drain installation. 24-hour cure time for membranes before tile.
- Week 2–3 — Tile installation: Floor tile first, then walls, then shower. Grout after 24 hours. Tile sealing (if natural stone) after grout cures.
- Week 3–4 — Fixtures and finishing: Vanity installation, sink, faucet. Toilet installation. Shower valve trim and shower head. Lighting fixtures, mirror, accessories. Exhaust fan cover.
- Week 4–5 — Final inspections and touch-ups: Plumbing and electrical finals. Caulking (tub/shower perimeter, vanity-to-wall, floor transitions). Touch-up paint. Final clean.
Total realistic timeline for a complete gut renovation of a small bathroom: 3–5 weeks. Projects with plumbing relocation, heated floors, or custom tile work that requires special ordering run closer to 5–6 weeks. Timelines that promise completion in a week or ten days almost always involve skipped steps, uninspected work, or a crew working in unsafe conditions.
One-Bathroom Home Strategies
If your home has only one bathroom — common in Vancouver bungalows — a full gut renovation creates a real logistical challenge. Here are the strategies that work:
- Phase the renovation: Complete demo, rough-in, and substrate in the first week when the bathroom is fully non-functional. From week 2 onward, the toilet can typically be reinstalled temporarily at the end of each day. This requires planning with your contractor but is very feasible.
- Temporary toilet rental: A portable toilet on your property (in the backyard or on the driveway) costs $150–$300/week including weekly service. Not glamorous, but entirely workable for 1–2 weeks.
- Gym membership or YMCA day pass: For showering during the first week. Many Vancouver YMCA locations offer day passes for under $15.
- Neighbour arrangement: If you have cooperative neighbours close by, even a verbal arrangement for morning shower access for one week can simplify things considerably.
Selecting a Contractor
For a small bathroom renovation in the $18,000–$32,000 range, you want a licensed general contractor who coordinates plumbing and electrical trades (rather than a handyman or tiler who subs out work informally). Ask any contractor you’re considering for:
- Their BC contractor’s licence number (verify at BC Housing’s Homeowner Protection Office)
- Proof of liability insurance and WCB coverage
- A minimum of 3 recent bathroom renovation references in Vancouver
- A written contract specifying scope, materials, timeline, and payment schedule
- Confirmation that permits will be pulled for all applicable work
Payment schedules should never front-load payments. A reasonable structure is 10–15% deposit, draws at completion of demo/rough-in, tile, and fixtures, and the final 10–15% held until substantial completion and inspection sign-offs. Any contractor demanding more than 25–30% upfront on a residential renovation is a red flag.
Ready to plan your renovation? Contact VGC for a free consultation, or visit our home renovation services page to see the full range of projects we handle across Vancouver and the Lower Mainland.
Small Bathroom Renovation Vancouver: FAQ
What is the minimum legal shower size in Vancouver?
The BC Building Code requires a minimum shower enclosure of 900mm × 900mm (approximately 36″×36″). This applies to showers used as the primary bathing facility. Some pre-built shower units are sold in 32″×32″ sizes, but installing these as a code-compliant primary shower is not permitted in BC. For comfort, we recommend 36″×48″ or larger whenever layout allows.
Is a wall-hung toilet worth the extra cost in a small bathroom?
In most cases, yes — particularly if the bathroom is under 45 sq ft. A wall-hung toilet projects 12–14 inches from the wall versus 26–28 inches for a floor-mounted toilet, and the clear floor underneath makes cleaning dramatically easier. The total installed cost premium over a standard toilet ($800–$1,400 more) is significant, but in a cramped 4×8 bathroom, recovering 12 inches of floor clearance can make the difference between a functional layout and one that feels impossibly tight.
What’s the difference between a wet room and a tiled shower?
A tiled shower has defined walls (two tiled walls and typically a glass enclosure on the other sides), a shower pan or tiled shower floor, and a threshold or curb that contains water. A wet room has no threshold — the entire bathroom floor is waterproofed and sloped to drain, so the shower area flows seamlessly into the rest of the room. Wet rooms require more comprehensive waterproofing but eliminate glass enclosure maintenance and create a very open, spa-like feel. They are particularly well-suited to small bathrooms where visual boundaries reduce the sense of space.
Should I use large or small tiles in a small bathroom?
Large-format tiles (12×24 or 24×24) generally make small bathrooms feel larger because they reduce the number of grout lines interrupting the visual field. The counter-intuitive advice to use large tile in small spaces is well-established in bathroom design and holds true in real Vancouver renovations. Small mosaic tiles (1×1, 2×2) are best reserved for shower floors where their flexibility conforms to the slope and the fine grout lines provide grip — not for walls or main floor areas in a small bathroom.
Do I need a permit for a bathroom renovation in Vancouver?
It depends on what’s being done. Like-for-like fixture replacement (same toilet, same location) does not require a permit. Moving drain lines or adding new plumbing fixtures requires a City of Vancouver plumbing permit. Any new electrical circuit — for lighting, heated floors, or outlets — requires a BC Safety Authority electrical permit. Structural changes (moving walls) require a City building permit. Your contractor should identify required permits at the quoting stage and should handle all applications as part of the project.
How long does a small bathroom renovation take in Vancouver?
A complete gut renovation (demo through final inspection) of a 35–50 sq ft bathroom typically takes 3–5 weeks. Projects involving custom tile, plumbing relocation, heated floors, or a wall-hung toilet with carrier frame installation can extend to 5–6 weeks. Any contractor promising a complete gut renovation in under 2 weeks should be asked very specifically what’s being skipped — the answer is usually inspections, proper waterproofing cure time, or grout cure time.
Can I live in my home during the renovation if it’s my only bathroom?
Yes, with planning. The first 5–7 days of demo and rough-in are the hardest — the toilet is removed and the bathroom is fully non-functional. After that, trades can typically reinstall the toilet at the end of each workday. Strategies include temporary toilet rental ($150–$300/week), gym day passes for showering, or a neighbour arrangement. For most Vancouver bungalow owners, a 1-week disruption followed by a gradual return to functionality is very manageable.
What is the typical cost breakdown for a mid-range small bathroom renovation?
| Category | Typical Cost (Mid-Range Reno) |
|---|---|
| Demolition and disposal | $800–$1,500 |
| Plumbing (rough-in + fixtures) | $3,500–$6,000 |
| Electrical (rough-in + fixtures) | $1,200–$2,500 |
| Tile (supply + labour) | $3,500–$6,500 |
| Shower enclosure (if applicable) | $1,800–$3,500 |
| Vanity + sink + faucet | $800–$2,000 |
| Toilet | $400–$800 (floor-mount) / $1,200–$2,200 (wall-hung) |
| Exhaust fan | $300–$600 |
| Lighting + mirror | $500–$1,500 |
| Permits | $300–$800 |
| Miscellaneous (accessories, caulk, paint) | $400–$800 |
| Total | $13,000–$25,900 |
What are the most common mistakes in small bathroom renovations?
The five most common mistakes we see in small Vancouver bathroom renovations:
- Inadequate waterproofing: Tile is not waterproof. The substrate behind it must be waterproofed. Builders who skip this step leave you with water damage behind the tile within 3–5 years.
- Undersized exhaust fan: A 50 CFM fan is barely adequate. Persistent moisture from an undersized fan leads to mould in grout, peeling paint, and eventual structural damage.
- Skipping permits: Unpermitted work creates real estate, insurance, and liability problems. It’s not worth it.
- Choosing fixtures before finalizing layout: The toilet, vanity, and shower must all be confirmed and dimensioned before rough-in. Changing fixture sizes after plumbing is roughed in is expensive.
- Underestimating the budget: Homeowners who budget $10,000 for a small bathroom renovation and get partway through frequently end up spending $20,000+ with a worse result than if they had planned properly from the start.
How do I choose between a shower and a tub in a small bathroom?
The primary factors are: (1) whether this is your only bathroom, (2) whether your household includes young children, and (3) your plans for the property. If you have young children or plan to sell within 3–5 years, keeping a tub preserves resale appeal. If you’re planning to stay long-term and your household has no need for a tub, removing it and replacing it with a properly sized shower will make the bathroom dramatically more functional and easier to maintain. Many Vancouver homeowners in this situation convert to shower-only and never regret it.
What tile do you recommend for a Vancouver small bathroom?
Our most consistent recommendation is a 12×24 or 24×24 light-toned porcelain tile for floors and walls, with a coordinating mosaic or small-format tile on the shower floor for grip. Light tones (warm whites, pale grey, cream) reflect light and make the space feel larger. A matte or honed finish on the floor provides grip when wet; a polished or semi-polished finish on walls adds reflectivity. Keep the grout colour close to the tile colour to minimize visual breaks — a dark grout on a light tile creates a busy pattern that makes small spaces feel smaller.
What should I ask a contractor before hiring them?
Ask for: their BC contractor’s licence number, proof of liability insurance and WCB coverage, a list of 3 recent bathroom references you can contact, their subcontractor arrangement for plumbing and electrical, who specifically will be on site each day, how they handle material allowances versus fixed pricing, what their process is for managing unexpected discoveries (rot, asbestos), and their policy on clean-up and site protection during the renovation. The quality of answers tells you a great deal about how the project will be managed.
Can I do any of the work myself to save money?
Some tasks are homeowner-friendly; most critical tasks are not. You can safely do: demolition (with proper safety precautions for pre-1990 homes — asbestos testing first), painting after tile is complete, installing accessories (towel bars, toilet paper holders), and basic cabinet assembly. You should not attempt: tile installation (poor tiling is the leading cause of bathroom moisture problems), plumbing rough-in or connections (requires a licence and permit), electrical work (BCSA requirements), or waterproofing (inadequate waterproofing is catastrophic). The savings from DIYing tile rarely exceed $800–$1,200, while the risk of a water damage callback is very real.
Does a small bathroom renovation add value to a Vancouver home?
Yes, consistently. A well-executed bathroom renovation in Vancouver typically returns 60–80% of its cost in increased property value, with primary bathrooms (ensuite or sole bathroom) returning more than secondary bathrooms. An outdated bathroom with original 1970s or 1980s finishes is a known price-reducing factor in Vancouver real estate — buyers either discount for it or negotiate for renovation credits. A renovated bathroom removes that objection. For homeowners planning to sell within 2–3 years, a mid-range renovation ($18,000–$28,000) in a properly budgeted project typically achieves close to full cost recovery.
How do I get started with VGC?
Contact us through our online form or phone to schedule a free consultation. We’ll visit your home, measure the space, discuss your goals and budget, and provide a detailed written estimate within 5 business days. We work throughout Vancouver, Burnaby, New Westminster, North Vancouver, and the broader Lower Mainland. You can also explore our renovation guide to understand the full process before we meet, or browse our home renovation portfolio to see completed projects.
Is heated flooring practical in a small bathroom?
Absolutely — and small bathrooms are actually the ideal use case for electric radiant floor heat. The total floor area is small (35–50 sq ft), so the heating mat cost and operating cost are modest. A 40 sq ft bathroom with an electric heating mat runs at roughly 350–400 watts — the equivalent of a few light bulbs. With a programmable thermostat set to warm up 30 minutes before your morning shower, the comfort benefit is significant and the operating cost adds $10–$20/month to your BC Hydro bill. Total installed cost: $1,200–$2,500 including the mat, thermostat, and electrical permit.
Get a Free Renovation Quote
Metro Vancouver’s trusted general contractors. Free consultations across Vancouver, Burnaby, Richmond, North Shore & beyond.
Get Your Free Quote →Ready to start your project? Vancouver General Contractors (VGC) provides free, fixed-price quotes for homeowners across Metro Vancouver. Learn more about our bathroom renovation Vancouver services or request a free quote today.
VGC serves Vancouver and surrounding areas. View all renovation services in Vancouver →
More Bathroom Renovations Guides
Frameless vs. Semi-Frameless Shower Door in Vancouver: Which is Worth the Cost?
Freestanding vs. Alcove Bathtub in Vancouver: Design, Space, and Cost Comparison
Porcelain vs. Natural Stone Tile for Vancouver Bathrooms: The Complete Comparison
Electric vs. Hydronic Heated Bathroom Floor in Vancouver: Which is Better?
Bathroom Renovation in Richmond: 2026 Planning and Cost Guide
Ready to start your renovation?
Comments are closed