
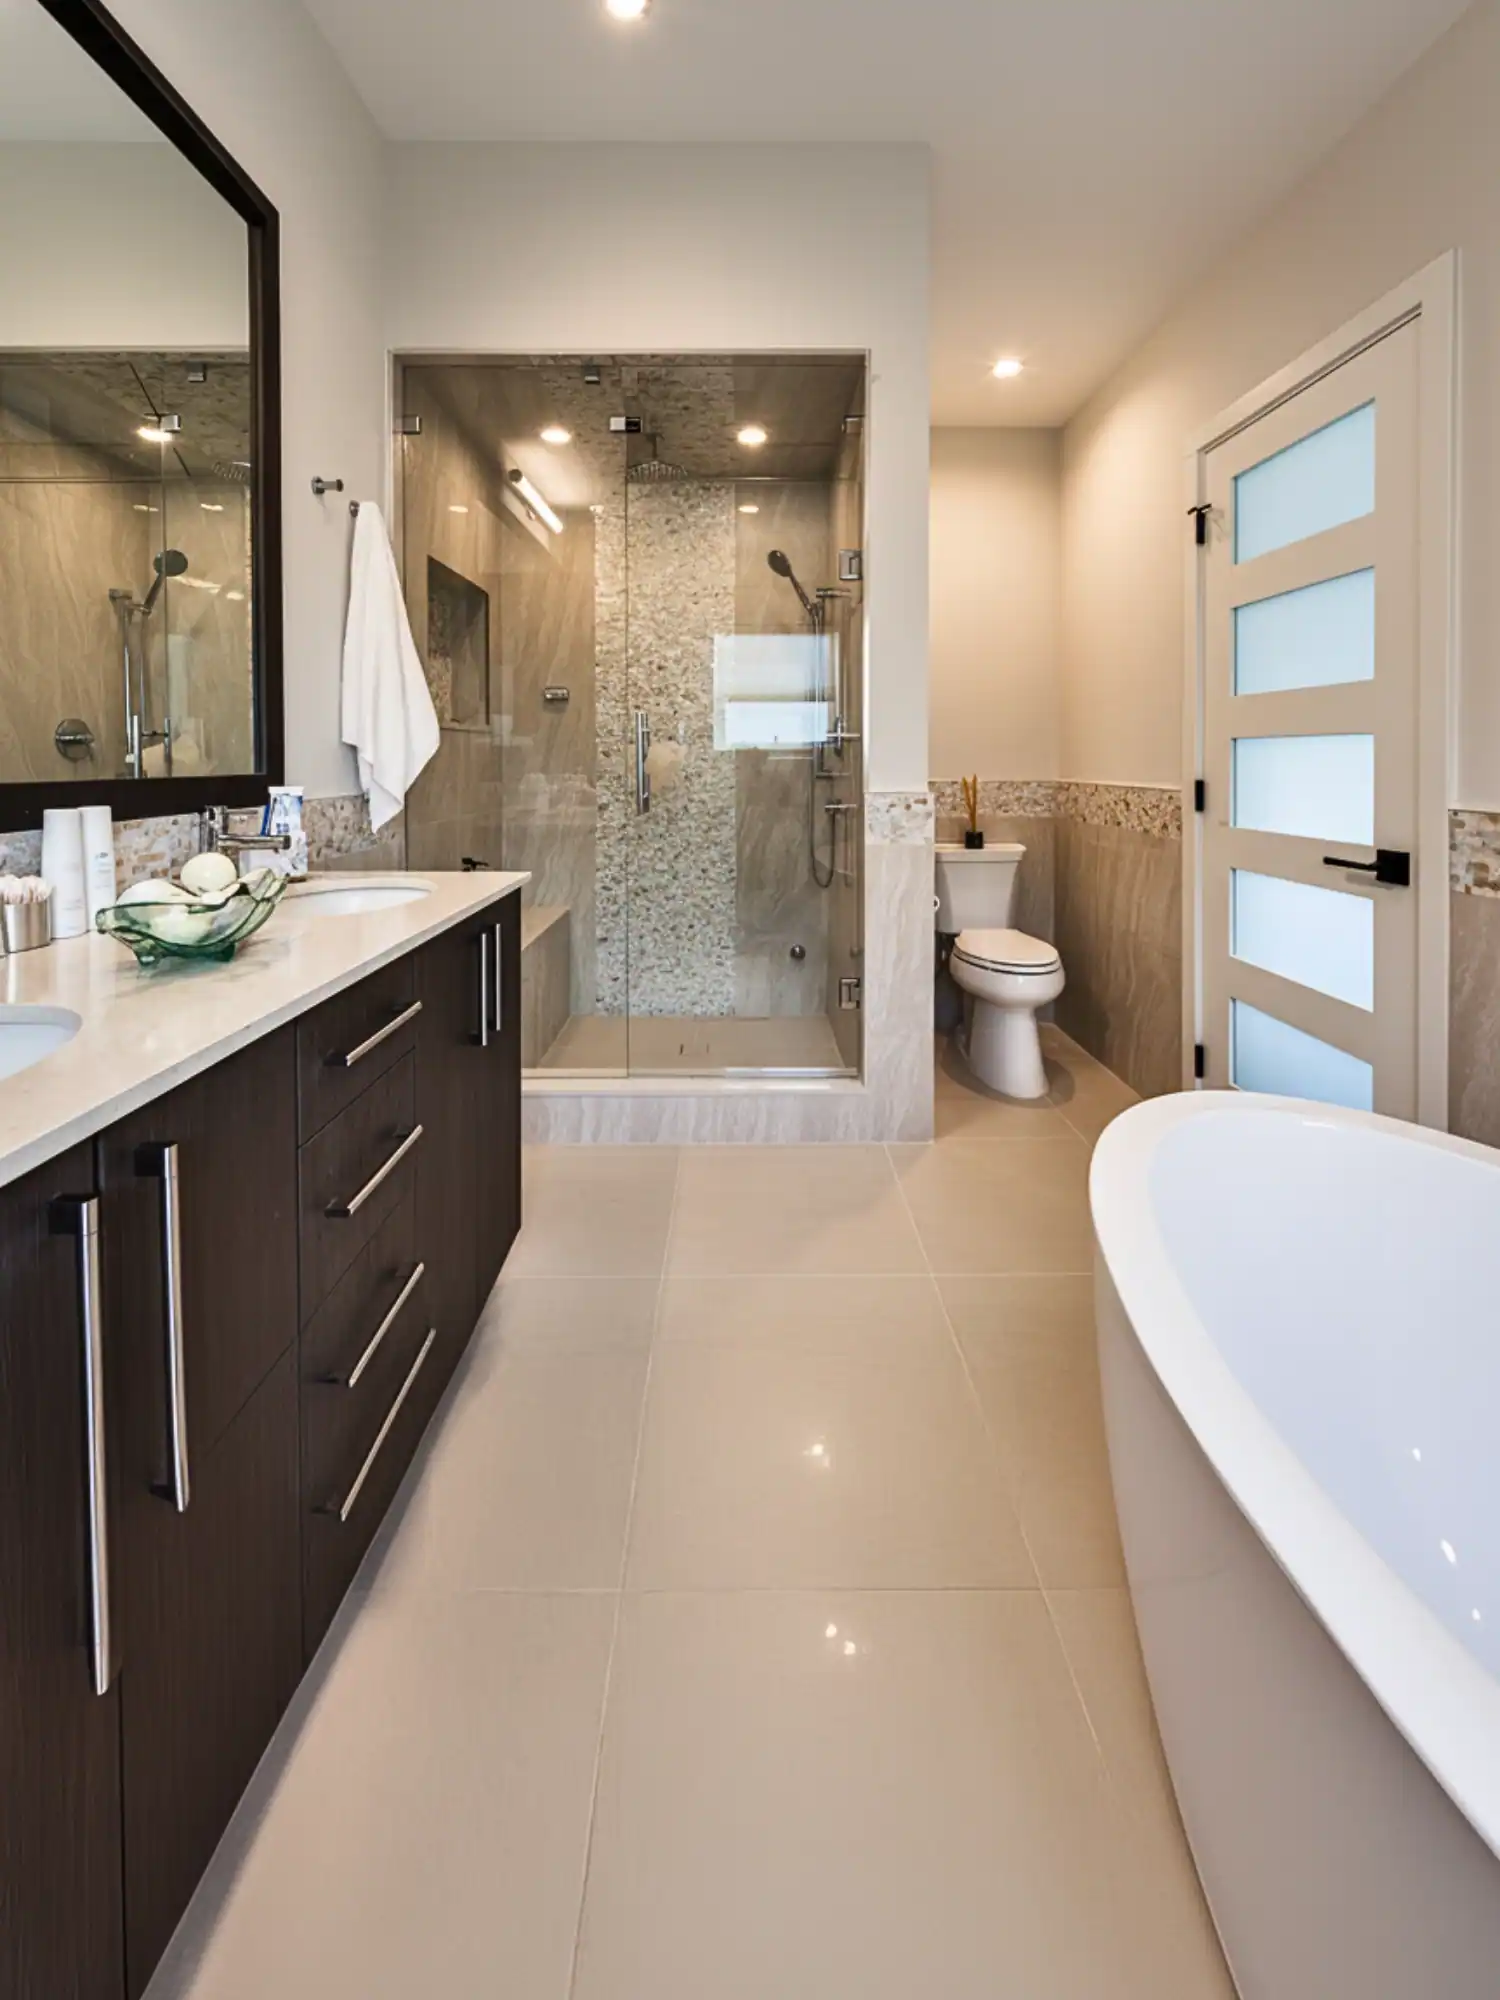
Walk-In Shower Vancouver: Design Ideas, Costs & Curbless Options (2026)
Walk-in showers have overtaken soaker tubs as the most-requested bathroom renovation in Vancouver. If you have a tub you haven’t used in three years and a bathroom that feels cramped and dated, you’re in good company — tub-to-shower conversions now account for the majority of bathroom renovation projects we complete across Vancouver, Burnaby, North Vancouver, and the surrounding Metro area. This guide covers everything you need to budget, design, and build the walk-in shower that fits your home, your style, and your life.
Why Walk-In Showers Are Dominating Vancouver Bathroom Renovations
The trend is hard to ignore. In a city where bathrooms in detached homes average 50–70 square feet and condo bathrooms often top out at 40–55 square feet, the standard tub-shower combo has become the default sacrifice: it takes up most of the room, it’s awkward to clean, and for the vast majority of Vancouver homeowners, the tub itself sees use fewer than a dozen times a year.
At the same time, the walk-in shower has matured from a luxury feature into a mainstream expectation. Curbless (zero-threshold) designs eliminate the trip hazard and step-over that make standard shower pans feel dated. Large-format porcelain tile has come down in price while going up in quality. Frameless glass enclosures that once started at $5,000 can now be sourced and installed for under $2,500 for a standard-sized opening. The result is a bathroom that photographs beautifully, cleans in minutes, and genuinely improves daily life.
 kitchen renovation with white quartz island in Vancouver” class=”wp-image-12765″ />
The cost of a tub-to-shower conversion ranges from roughly $8,000 for a basic tiled walk-in shower to $28,000 or more for a large curbless shower with premium tile and a frameless glass enclosure
Vancouver General Contractors
Aging-in-place design is a second and growing driver. Vancouver’s population is aging, and a curbless walk-in shower with a fold-down bench and a hand-shower is a functional upgrade that adds real value — both for current residents and for future buyers. Real estate agents consistently report that updated walk-in showers are among the top features buyers notice and prioritize in the Vancouver market.
Finally, there is the straightforward question of space. Removing a 60-inch bathtub from a master bathroom can free up 12–15 square feet of usable floor area. That space can become a larger shower, a double vanity, better storage, or simply a bathroom that doesn’t feel like a hallway with plumbing.
The cost of a tub-to-shower conversion ranges from roughly $8,000 for a basic tiled walk-in shower to $28,000 or more for a large curbless shower with premium tile and a frameless glass enclosure. Keeping the tub is free — but so is living with a bathroom you don’t enjoy. Most homeowners who have done the conversion report they never look back.
Walk-In Shower Costs in Vancouver: Full Price Breakdown for 2026
Labour rates in Metro Vancouver are among the highest in Canada, and bathroom renovation costs reflect that. The figures below are realistic all-in estimates based on projects completed in Vancouver, Burnaby, and North Vancouver. They include demolition, waterproofing, tile supply and installation, glass enclosure, fixtures, and permit fees where applicable. They do not include vanity upgrades, flooring outside the shower, or electrical panel work unless specified.
| Shower Type | Typical Size | All-In Cost Range | What’s Included |
|---|---|---|---|
| Basic tiled walk-in (curbed) | 36″×48″ | $8,000–$14,000 | Cement board, Kerdi waterproofing, subway or standard porcelain tile, semi-frameless glass door, pressure-balance valve, single showerhead |
| Mid-range frameless glass | 42″×60″ | $14,000–$22,000 | Curbless or low-curb, linear drain, large-format tile, 10mm frameless glass enclosure, thermostatic valve, rain head + hand shower |
| Large-format tile curbless | 48″×60″ or larger | $18,000–$28,000 | Full curbless, full Wedi board waterproofing, 24″×48″+ porcelain or book-matched slab, frameless glass, premium fixtures, niche |
| Steam shower | 48″×48″ minimum | $22,000–$40,000 | Above + steam generator (7–12kW), steam-rated tile, pitched ceiling, sealed glass door, bench, dedicated 240V circuit |
| Wet room (no glass enclosure) | Full bathroom floor | $25,000–$45,000 | Full bathroom waterproofed, trench drain, open shower zone, premium large-format tile throughout |
The single biggest variable in shower cost is tile. A standard 12×24 porcelain tile purchased from a local supplier like Olympia Tile or Centura might run $4–$8 per square foot before installation. A book-matched porcelain slab from a premium importer can run $25–$65 per square foot. Installation labour for large-format or pattern tile is also higher — a tile setter working with 24×48 slabs in a wet area charges more per hour and takes longer than setting standard 12×24 tile.
Glass enclosures are the second major variable. A semi-frameless sliding door from a mid-range Canadian supplier (Fleurco, Vigo, Dreamline) starts around $900–$1,400 supply-only. A fully custom 10mm frameless hinged panel with a fixed side lite, fabricated and installed by a local glass company, runs $2,200–$4,500 depending on the opening size and hardware finish. Brushed gold and matte black hardware command a $200–$500 premium over chrome and brushed nickel.
Labour for the tile setter, plumber, and glass installer will generally run $4,500–$9,000 for a standard conversion depending on scope. Demolition and disposal add $800–$1,500. Waterproofing materials and labour add $800–$1,800. Drywall, paint, and incidentals add another $500–$1,200. If you are moving drain locations or adding a dedicated circuit for a steam generator, plumbing and electrical will add $1,500–$4,500 depending on complexity.
We recommend budgeting at the mid-point of your chosen tier and holding 10–15% contingency. Older Vancouver homes frequently reveal surprises behind the walls — water damage from a previous leak, plumbing that doesn’t meet current code, or structural framing that needs to be worked around. These situations are common and manageable, but they cost money.
Curbless (Zero-Threshold) Shower Design: How It Works and What It Costs
A curbless shower — also called a zero-threshold or barrier-free shower — has no curb or lip at the entry point. The bathroom floor and the shower floor are at the same level (or within a few millimetres), and water is controlled by a linear drain running along one wall, a centre drain, or a trough drain at the far end of the shower. The floor slopes gently toward the drain — typically 1/4 inch per foot — across the entire wet zone.
Done correctly, a curbless shower is watertight, requires no step-over, and looks like it was designed into the home from day one. Done incorrectly — with inadequate waterproofing, poor slope, or a drain that backs up — it becomes a source of water damage that spreads across the bathroom floor and into the subfloor before anyone notices.
The technical requirements for a successful curbless shower are more demanding than for a curbed shower with a prefab pan. The waterproofing membrane must extend across the entire wet zone floor — typically at least 18 inches beyond the shower opening in each direction — and up the walls to a height of at least 6 inches at the transition. The subfloor must be stiff enough to prevent flex that could crack the tile and open gaps in the waterproofing layer. The drain must be installed at the precise height to achieve the correct slope without creating a visible hump or valley in the floor surface.
Linear drains deserve special mention. A well-chosen linear drain — Schluter Kerdi-Line, Infinity Drain, or ACO are the premium options commonly used in Vancouver — makes a curbless shower both more functional and more visually refined. A single strip of tile covers the drain grate, creating a nearly invisible drainage line along one wall. Linear drains also simplify tiling: the floor slope runs in a single direction rather than four-way pitch toward a centre drain, which means large-format tiles can be laid flat without the visible slope that betrays a poorly installed centre-drain curbless shower.
The minimum recommended size for a functional curbless shower is 36×36 inches, but at that size the absence of a curb matters a great deal because you have little room to manoeuvre. We recommend a minimum of 42×42 inches for a curbless shower, and 48×60 or larger if the bathroom permits. With a curbless design and no glass enclosure (a wet room configuration), you need at least 60 inches of shower depth to prevent water from reaching the rest of the bathroom floor under normal use.
The cost premium for a curbless shower over an equivalent curbed shower is typically $2,000–$5,000. This covers: the linear drain itself ($300–$900 supply), additional waterproofing material and labour to cover the expanded wet zone ($400–$800), the precision work required to set the floor slope correctly ($300–$600 in additional labour), and any subfloor build-up needed to bring the shower floor to the correct level relative to the bathroom floor ($200–$600). These are worthwhile costs for the functional and aesthetic result.
Shower Size Guide: Finding the Right Dimensions for Your Vancouver Bathroom
Shower size is the most consequential design decision you will make, and it is the one most often compromised due to cost pressure or spatial constraints that turn out to be more flexible than they appear. Here is a realistic guide to what different sizes feel like in daily use.
| Size | Feel in Use | Best For | Notes |
|---|---|---|---|
| 36″×36″ | Tight — functional minimum | Secondary bathrooms, small condos | BC code minimum for walk-in shower; elbows hit walls when washing hair |
| 36″×48″ | Adequate — most common | Standard master bathroom conversions | Comfortable for one person; easier to clean than 36×36 |
| 42″×42″ | Comfortable | Curbless designs, aging-in-place | Recommended minimum for curbless; fits fold-down bench on one wall |
| 48″×48″ | Spacious — noticeable difference | Master bathrooms, steam showers | Comfortable for two; minimum for a steam shower bench layout |
| 48″×60″ | Generous — luxury feel | Primary suite renovations | Room for bench, rain head overhead, hand shower, body jets |
| 60″×60″ and larger | Spa-level | High-end renovations, wet rooms | Typically requires removing a wall or reconfiguring the bathroom layout |
Vancouver master bathrooms in detached homes built between 1970 and 2000 typically measure 50–70 square feet and are configured with a 60-inch tub, a single vanity, and a toilet. When you remove the tub, you gain roughly 12–15 square feet. That space rarely adds up neatly to a larger shower opening — the plumbing is in a fixed location, the walls are load-bearing, the floor joists run a certain direction — but with a proper plan, it almost always allows a meaningfully larger shower than the standard 36×36 builder tub-shower combo that occupied the same footprint.
A common and successful approach in Vancouver homes: remove the 60-inch tub, extend the shower to 60×36 inches using the full tub alcove width, and add a linear drain along the far wall. The result is a shower that feels twice as large as the original, costs less than a major bathroom reconfiguration, and reuses the existing drain location with a simple extension.
In condo bathrooms, size constraints are more rigid because moving plumbing typically requires cutting into a concrete slab — a significant cost ($3,000–$6,000) that needs to be weighed against the benefit. In most condo conversions, we work within the existing drain location and focus on maximizing the shower within the existing footprint using a curbless design, glass rather than tile walls on one side, and strategic use of large-format tile to make the space read as larger.
Glass Enclosure Options: Frameless, Semi-Frameless, and Beyond
The glass enclosure is often the most visible design element in a walk-in shower. It determines whether the shower feels open and contemporary or dated and utilitarian. Here is a breakdown of the main options and realistic costs in the Vancouver market.
Frameless glass ($1,800–$3,500 installed for a standard 36–48 inch opening) uses thick tempered glass — typically 10mm — with minimal metal hardware. The hinges, handle, and any clips or channels are polished or brushed metal that complements rather than surrounds the glass. The result is the most open, modern look available and is the current standard for mid-range and higher bathroom renovations in Vancouver. Frameless glass does require precise installation: the opening must be plumb and square, the glass panels are custom-fabricated to the exact opening dimensions, and adjustments after fabrication are not possible. Lead time is typically 3–4 weeks from templating to installation.
Semi-frameless glass ($1,200–$2,200 installed) uses a metal channel at the top and sides with a frameless door. The channel provides a degree of flexibility during installation — minor variations in plumb and square can be accommodated — and the door swings freely like a frameless door. This is a practical choice for projects where the tile work might have minor variations or where budget is a priority. From a normal viewing distance, it is nearly indistinguishable from fully frameless.
Framed glass ($800–$1,400 installed) uses a full metal frame surrounding the glass panels and door. It is the least expensive option and the most forgiving during installation, but it looks dated in most contemporary bathroom designs. The horizontal metal track at the floor level of sliding doors is particularly difficult to clean and is one of the first things Vancouver homeowners want to remove when renovating an older bathroom.
Doorless/open configurations eliminate the glass door entirely — and the cost associated with it. This works in showers that are large enough (generally 60 inches or more in depth) and designed with a return wall or screen panel to contain water. It is increasingly popular in wet room designs and in showers where a fold-down bench and accessible design are priorities. The savings on the door hardware are real, but the shower needs to be sized and designed for the doorless configuration from the start.
A few practical notes on glass selection. Hinged doors require clearance to swing — usually 24–30 inches of clear floor space in front of the door. If your bathroom is tight, a fixed panel with a sliding or bi-fold door may be a better solution. Sliding doors save floor space but are harder to clean because of the bottom track. Pivot doors (hinged at the top and bottom) are a frameless-looking option for wide openings without the space requirements of a full side-hinged door.
Glass thickness affects both durability and aesthetics. The 6mm glass common in lower-cost enclosures is structurally adequate but flexes slightly when the door is opened and closed, and the panels can look thin and lightweight. The 10mm glass used in frameless enclosures is notably more substantial — it has a visual weight and rigidity that reads as quality. For a primary bathroom renovation where you are spending $15,000 or more, the upgrade from 6mm to 10mm glass is worthwhile.
Tile Options for Walk-In Showers: From Subway to Slab
Tile is where a walk-in shower becomes personal. The range of available options has expanded dramatically in the last decade, and Vancouver has strong access to premium tile through suppliers like Centura, Olympia Tile, Marble Systems, and several independent importers in South Vancouver and Richmond. Here is a practical overview of the main tile categories and what they cost in wet area applications.
Large-format porcelain (24×24, 24×48, 12×48) is the dominant choice in contemporary Vancouver renovations. Modern digital printing technology has made porcelain indistinguishable from natural stone or concrete at a fraction of the maintenance cost. The larger format means fewer grout lines, which reads as more luxurious and is genuinely easier to keep clean. Supply cost runs $5–$18 per square foot. Installation for large-format tile in wet areas is more expensive than standard tile — the tile setter must back-butter each slab, use a medium-bed mortar, and check for lippage after each row. Expect to pay 20–40% more for installation labour compared to standard 12×24 tile.
Subway tile (3×6, 4×8, 3×12) remains popular for its clean, timeless look and relatively low cost ($3–$8 per square foot supply). Variations in size, finish, and grout colour create very different results — a matte 4×8 subway tile in white with a wide charcoal grout joint reads as industrial; a 3×6 white gloss subway with tight white grout reads as spa-classic. The main limitation is grout maintenance: more grout lines mean more surface area to clean and more potential for staining over time.
Zellige tile (traditional Moroccan handmade ceramic, typically 4×4) has become a signature element in high-end Vancouver bathroom renovations over the last three years. The irregular surface, variation in colour and glaze, and artisanal quality creates a warmth that machine-made tile cannot replicate. Supply cost runs $18–$45 per square foot. Installation requires an experienced tile setter who understands the variation in thickness and size inherent in handmade tile. It is stunning in the right setting but requires more grout maintenance than smooth porcelain.
Book-matched porcelain slabs (large format slabs, 60×120 or 48×96 inches) represent the current premium of the tile market. Two adjacent slabs are cut from the same digital master image and installed side-by-side, creating a near-seamless mirrored pattern. Supply cost runs $20–$65 per square foot. Installation requires specialized equipment to handle slabs this size in a wet area. When done well, the result is a shower that appears to be clad in a single continuous stone surface — visually dramatic and genuinely impressive.
Natural stone (marble, travertine, slate, limestone) adds warmth and organic variation that no porcelain can fully replicate, but comes with maintenance requirements that many homeowners underestimate. Marble and travertine require sealing on installation and annually thereafter. Travertine’s natural pitting fills with soap scum and requires periodic re-grouting. Slate and slate-look tile is more maintenance-tolerant but heavier and more variable. If you choose natural stone for a shower, budget for professional sealing on completion and plan for annual maintenance.
For shower floors specifically, anti-slip rating is a code requirement and a safety priority. BC building code requires shower floor tiles to have a wet slip resistance of at least R9 (DIN 51097 scale), and R11 or higher is strongly recommended for curbless showers where wet feet exit onto the same tile surface. Small mosaic tiles (2×2 or smaller) provide natural slip resistance through the increased number of grout lines, which is why 1×1 or 2×2 mosaic remains common for shower floors even in designs where large-format tile covers the walls.
Shower Niche Design: Built-In Storage That Looks Like It Belongs
A shower niche — a recessed shelf built into the wall — is one of those design details that separates a professionally designed shower from a builder-grade one. Done well, a niche provides functional storage without protruding into the shower space, creates an opportunity for a tile accent, and eliminates the plastic corner caddies that clutter shower walls and never stay attached to the tile. Done poorly — with inadequate waterproofing, incorrect placement, or tile that doesn’t quite align — a niche becomes a source of chronic leaks and a visual distraction.
The standard single niche measures 12×24 inches and is set into one stud bay in the wall. A double niche uses two bays side by side. Height placement matters: the niche should be at shoulder height (approximately 54–60 inches from the floor) when positioned on the wall opposite or beside the showerhead, so you’re not blocking the spray when reaching for shampoo. Many designers place the niche slightly off-centre within the tile field rather than exactly centred on the wall — this avoids the awkward situation of a niche centred on a wall that is also centred with a window or door, which rarely works out symmetrically in real bathrooms.
Waterproofing a niche requires particular care. The back and sides of the niche cavity must be waterproofed with the same system used on the rest of the shower walls — Kerdi, RedGard, or Wedi board — and the tile inside the niche must be properly bedded and grouted. The shelf slope must pitch very slightly forward (1/16 inch or so) so water doesn’t pool on the shelf. These are details that a good tile setter handles without being asked, but they are worth confirming during the planning conversation.
Tile selection for the niche interior is an opportunity. A common and effective approach: use the same tile as the surrounding wall but in a contrasting orientation (vertical tile in the niche where the field tile is horizontal), or use a complementary accent tile — a darker shade, a small mosaic, or a contrasting material — for the niche back only. This creates a visual focal point that pulls the eye and makes the shower feel more considered and designed.
Pre-made niches — Schluter’s Kerdi-Board-SN system, Wedi’s pre-formed niches, and similar products — simplify waterproofing and are particularly useful when the wall framing doesn’t accommodate a standard 3.5-inch-deep custom niche. They cost more in materials ($80–$200 for the niche unit itself) but less in labour since they arrive pre-formed and pre-waterproofed. Custom tile niches built from cement board or Wedi board cost $800–$1,500 installed depending on size and tile.
Shower Fixtures: Rain Heads, Thermostatic Valves, and Body Jets
Shower fixtures are where budget and aspiration diverge most visibly. The core function — hot water delivered at the right temperature — can be achieved for $300 in hardware. The experience of that water delivery varies enormously based on the fixtures you choose, and in a shower you use every day, the difference between a $180 pressure-balance valve with a standard showerhead and a $1,200 thermostatic system with a ceiling rain head and hand shower is felt every morning.
Showerheads. A ceiling-mounted rain head (8–12 inches in diameter, sometimes larger) provides the immersive overhead coverage that defines the high-end shower experience. Installed supply-and-labour cost runs $400–$1,200 depending on the head size and brand. The ceiling supply line must be roughed in during construction — this is not an add-on after the tile is set. Wall-mounted heads are simpler to install and direct-able, which many people prefer for quick rinses. A combination of a ceiling rain head and a wall-mounted hand shower on a slide bar is the most functional two-outlet configuration.
Hand showers on a slide bar are both a luxury and an accessibility feature. They make rinsing the shower enclosure faster, make bathing children and pets easier, and are a key element in aging-in-place design where a seated shower requires a movable spray source. Supply-and-install cost runs $200–$600 depending on the brand and slide bar finish.
Body jets (also called body sprays) are wall-mounted spray nozzles positioned at mid-body height to deliver lateral water coverage. They are a genuine luxury, particularly when combined with a thermostatic valve that allows multiple outlets to run simultaneously. Installed cost runs $150–$450 per jet; most spa shower designs use 4–8 jets. The practical consideration: body jets require significant water volume, which means your hot water system — whether a tank or tankless heater — must have the capacity to maintain temperature across 3–6 simultaneous outlets. This is a conversation to have early in the design process.
Valves. BC plumbing code requires a pressure-balance valve on any new shower installation — this is the safety device that prevents scalding when someone flushes a toilet. A pressure-balance valve controls temperature by keeping the hot-to-cold ratio constant when supply pressures change, but it does not maintain a set temperature between uses. A thermostatic valve — offered by Grohe, Hansgrohe, Riobel, Kohler, and others — maintains a precise preset temperature, allows multiple outlets, and separates volume control from temperature control. Any shower with more than one outlet (a rain head plus a hand shower, for example) should use a thermostatic valve both for comfort and for BC code compliance regarding multiple-outlet systems.
For brand recommendations in the Vancouver market: Riobel (Montreal-manufactured, excellent value and widespread distribution), Grohe (German engineering, wide range, well-supported parts and service), Hansgrohe (German, premium tier, particularly good rain heads), and Delta Trinsic (well-priced Canadian distribution, good mid-range option) are all reliably available through local plumbing showrooms like Wolseley, Elte, or Splash Kitchens and Baths.
Steam Shower Conversion: What You Need to Know Before You Commit
A steam shower takes a standard walk-in shower and adds a generator — a sealed electric water heater the size of a large shoebox, installed in a nearby cabinet or vanity — that boils water and delivers steam through a small chrome nozzle at foot level in the shower wall. The result is a home steam room: 110–120°F ambient temperature, 100% humidity, and a 15–20 minute session that is genuinely therapeutic. For homeowners who would use a steam shower 3–5 times per week, it is a meaningful quality-of-life addition.
The additional cost over a standard walk-in shower is $6,000–$18,000 depending on generator size, electrical work, and the specific tile and glass requirements for a steam environment. Here is what drives that cost:
The steam generator itself runs $1,500–$4,500 supply depending on the kW rating. Generator sizing follows a simple rule: approximately 1 kW per 45–50 cubic feet of shower volume, plus adjustments for natural stone tile (which absorbs heat and requires more capacity) and glass walls versus tile walls. A 48×48×8-foot shower with tile walls and a glass ceiling requires roughly a 7.5 kW generator. Quality brands available in Canada include MrSteam, Steamist, ThermaSol, and Kohler. Tile-ready generators come with a waterproof control pad that can be set into the shower wall.
Electrical requirements are significant. Steam generators require a dedicated 240V circuit sized to the generator’s amperage draw — a 9 kW generator draws approximately 37.5 amps at 240V, requiring a 50-amp dedicated circuit from the panel. If your panel is full or undersized, this may require a panel upgrade, adding $1,500–$4,000 to the electrical cost. An electrical permit is always required for this work in Vancouver.
The ceiling must be pitched in a steam shower. A flat ceiling collects condensation that drips onto bathers — uncomfortable and potentially damaging to tile and grout over time. The standard approach is to pitch the ceiling at least 1/2 inch per foot toward one wall. In a shower with a standard 8-foot ceiling, this requires a sloped ceiling form built by the carpenter or tile setter before the waterproofing and tile go in.
The glass door must seal. A standard frameless shower door has a small gap at the floor and sides — perfectly adequate for a regular shower but insufficient for a steam shower. Steam doors require a full-perimeter seal (typically a magnetic sweep and side seals) to keep the steam contained. This adds $200–$400 to the glass enclosure cost and must be specified at the time of glass fabrication, not as an afterthought.
Steam showers are compatible with most tile types, but natural stone requires more attention. Some natural stones — particularly porous marbles — can absorb moisture and develop staining or efflorescence in a high-humidity environment. Porcelain, ceramic, and sealed slate are the most reliable choices for steam shower walls and ceilings. The steam nozzle itself generates localized heat; tile within 12 inches of the nozzle should be rated for high-temperature exposure (most commercial-grade porcelain qualifies).
Operating cost is modest: a standard 9 kW generator running for 20 minutes consumes approximately 3 kWh of electricity. At BC Hydro’s current residential rate of approximately $0.16–$0.17 per kWh (Tier 1), a single steam session costs roughly $0.48–$0.51. Daily use for a year runs approximately $175–$190 in electricity, plus water for the steam itself (approximately 1 litre per minute of session time).
Waterproofing Walk-In Showers: The Step That Determines Whether Your Renovation Lasts
Waterproofing is the most important step in a shower installation and, in our experience, the most commonly compromised one. It is easy to under-invest in waterproofing because the results of inadequate waterproofing are invisible for months or years — until they are catastrophically visible in the form of mold growing behind tile walls, subfloor rot, and water damage in the ceiling of the room below. The remediation cost for a failed shower waterproofing job in a typical Vancouver home runs $15,000–$40,000 once the water damage, mold remediation, structural repairs, and shower reconstruction are factored in. The cost of doing waterproofing correctly in the first place is $800–$1,800 in materials and labour.
There are three main waterproofing systems used in quality shower installations in Metro Vancouver:
Schluter Kerdi is a sheet membrane made of polyethylene foam with a fleece backing on both sides. It is bonded to the wall surface using unmodified thin-set mortar and creates a continuous waterproof barrier under the tile. Kerdi is used with the complete Schluter system — Kerdi-Board substrate panels, Kerdi-Band corner strips, Kerdi-Drain — and when installed by a competent tile setter, is one of the most reliable waterproofing systems available. The complete Schluter system for a standard 36×48 shower adds approximately $400–$700 in materials.
RedGard (Custom Building Products) is a liquid-applied membrane brushed or rolled onto cement board or concrete. It creates a flexible waterproof coating that bridges minor cracks and is significantly faster to apply than a sheet membrane. It is widely used in Vancouver and is reliable when applied at adequate thickness (the coverage rate must be followed carefully — underapplication is a common failure point). RedGard materials cost $150–$300 for a standard shower.
Wedi board is a foam-core substrate panel with a fibreglass-reinforced cement coating on both sides. Unlike cement board (HardieBacker, Durock), Wedi board is itself waterproof — there is no separate membrane to apply. Panels are joined with Wedi joint sealant and the seams are taped and sealed. Wedi is particularly well-suited for curbless shower floors and complex shower configurations because it can be cut and shaped more easily than cement board. Material cost is higher than cement board — roughly double per panel — but labour can be faster because the separate membrane step is reduced. A Wedi-based shower adds approximately $600–$1,200 in materials over cement board.
Regardless of the system used, certain inspection points are non-negotiable. The corners (floor-to-wall and wall-to-wall) are the highest-failure zones and must be reinforced with fabric tape embedded in the membrane. The area around the drain must be continuously waterproofed with no gap between the drain flange and the membrane. If a niche is present, the niche interior must receive the same waterproofing treatment as the rest of the walls. Any penetrations — the valve body, the showerhead stub-out, body jet supplies — must be sealed at the point where they pass through the membrane.
When hiring a contractor for a shower renovation, ask specifically about the waterproofing system to be used, who will apply it, and whether a water test will be done before tile is set. A professional contractor should be able to describe the system clearly, should not hesitate to let you inspect the waterproofing layer before tile installation, and should perform a flood test (plugging the drain and filling the shower pan with water for 24 hours) on curbless installations before proceeding. These are not unreasonable requests — they are the marks of a contractor who takes this step seriously.
Permit Requirements for Walk-In Showers in Vancouver
Understanding permit requirements before you start is not bureaucratic formality — it protects you from legal liability, ensures your contractor meets a minimum standard of competence, and protects your home insurance coverage. In the City of Vancouver, the rules for shower renovation permits are straightforward once you understand the underlying logic.
A building permit is NOT required for a like-for-like shower replacement where the plumbing drain and supply locations remain unchanged, no walls are being moved, and no new electrical circuits are being added. Replacing tile, replacing fixtures at existing rough-in locations, or replacing a shower pan within an existing shower stall all fall into this category. This covers the majority of standard shower refreshes and basic tub-to-shower conversions where the tub drain and supply locations are reused.
A plumbing permit IS required when: you are relocating the shower drain (including moving from a corner drain to a linear drain in a new position), adding new plumbing supply lines (for a body jet system that requires new rough-ins not in the existing plan), or converting from a tub to a shower where the drain location changes. In the City of Vancouver, plumbing permits for residential work are obtained by the licensed plumber performing the work. Your general contractor or tile contractor typically arranges this as part of the project scope.
An electrical permit IS required for any new dedicated electrical circuit. A steam generator always requires a new dedicated 240V circuit, and an electrical permit for this work is mandatory without exception. The permit is obtained by the licensed electrician and includes an inspection by the City before the panel work is energized. For in-floor heating under shower tile (electric radiant), a permit is similarly required.
The City of Vancouver building permit application for bathroom renovations that require permits is submitted online through the City’s Development & Building Services portal. Permit processing times for straightforward residential bathroom renovations are typically 2–4 weeks for a complete application. Your contractor should include permit acquisition in their scope and timeline — if a contractor proposes to skip permits on work that requires them, that is a significant red flag about their overall approach to quality and code compliance.
For properties in strata (condos and townhouses), there is an additional layer: strata bylaws often require approval for any bathroom renovation, permit or not, because water damage in a strata building affects multiple units. Check your strata bylaws and get written approval from your strata council before starting work. Some stratas require a licensed contractor with proof of liability insurance and WorkSafe BC coverage to be on file before work begins.
If you are in a heritage-designated property in Vancouver, additional review may apply even for interior bathroom work. Check with the City’s Heritage Group early in your planning process if this applies to your home.
Ready to get started? Contact our team for a free consultation and detailed quote for your walk-in shower project. You can also review our complete home renovation guide for a broader overview of what to expect from a full bathroom renovation. For general renovation planning resources, see our home renovation services page.
More Bathroom Renovations Guides
Frameless vs. Semi-Frameless Shower Door in Vancouver: Which is Worth the Cost?
Freestanding vs. Alcove Bathtub in Vancouver: Design, Space, and Cost Comparison
Porcelain vs. Natural Stone Tile for Vancouver Bathrooms: The Complete Comparison
Electric vs. Hydronic Heated Bathroom Floor in Vancouver: Which is Better?
Walk-In Shower Renovation in Vancouver: Design Options, Waterproofing, and Costs
Ready to start your renovation?
Walk-In Shower Vancouver: Frequently Asked Questions
How much extra does a curbless shower cost compared to a standard curbed shower?
Expect to pay $2,000–$5,000 more for a curbless (zero-threshold) shower compared to an equivalent curbed shower. The premium covers: a linear drain ($300–$900 supply), extended waterproofing material and labour to cover the wet zone transition area, the precision subfloor work required to achieve correct slope without visible pitch changes, and any subfloor build-up needed to bring the shower floor flush with the bathroom floor. This is money well spent — the curbless design is safer, more accessible, and looks better than a curbed shower in virtually every contemporary bathroom design context.
What is the minimum size for a walk-in shower in Vancouver?
BC building code sets the minimum shower size at 36×36 inches. In practice, this is a code minimum, not a comfort recommendation. A 36×36 shower is usable but genuinely cramped — you will feel the walls when washing your hair. We recommend a minimum of 36×48 inches for a primary bathroom shower, and 42×42 inches or larger for any curbless design. If your bathroom layout allows, 48×48 inches is the point where a shower starts to feel genuinely spacious.
Is frameless glass worth the extra cost over semi-frameless?
For a primary bathroom renovation where aesthetics matter, yes. Fully frameless 10mm glass has a visual quality and substance that semi-frameless cannot fully replicate — the glass itself reads as a design element rather than a utilitarian enclosure. The practical difference from an everyday-use perspective is minor; both are easy to clean and durable. The cost difference is typically $400–$800 for a standard opening. If you are spending $15,000 or more on a shower renovation, the frameless upgrade is worth it. For a secondary bathroom or a renovation primarily motivated by function rather than aesthetics, semi-frameless is a very good option.
Can I remove my bathtub and replace it with a walk-in shower?
Yes — this is the most common type of bathroom renovation we do in Vancouver. The tub is removed, the space is reconfigured to maximize the shower footprint, and a new walk-in shower is built in its place. The main considerations are plumbing (the tub drain and shower drain are typically in similar locations, but confirm this before finalizing your design), structural (ensure the subfloor can support the new tile weight and that any load-bearing elements are addressed), and resale value (if your home has only one bathroom, removing the only tub can affect appeal to families with young children — consider this carefully).
Why is waterproofing so important in a walk-in shower?
Because water is patient and walls are not. Every shower generates water vapour and splash that, over time, finds any gap in the tile and grout and migrates into the wall or floor assembly. Without a continuous waterproof membrane between the tile surface and the structural wall, this moisture accumulates in the wood framing, drywall, and subfloor — creating conditions for mold growth, structural rot, and eventually visible damage (bubbling paint, soft spots in the floor, staining on ceilings below). The average cost to remediate a failed shower waterproofing in a Vancouver home is $15,000–$40,000. Correct waterproofing costs $800–$1,800. There is no rational argument for skipping it.
Is a steam shower worth the investment?
For homeowners who will use it regularly (3+ times per week), yes. The operating cost per session is under $0.60 in electricity, the therapeutic benefits of steam heat are well-documented, and the resale value of a properly built steam shower in a primary bathroom is meaningful in the Vancouver market. The caveat is that steam showers require specific construction details (pitched ceiling, sealed door, adequate electrical capacity, generator sizing) and cost $6,000–$18,000 more than an equivalent standard shower. If you will use it irregularly, the investment is harder to justify — a high-quality thermostatic shower system with a rain head delivers most of the luxury experience at a fraction of the cost.
How do I minimize grout maintenance in a walk-in shower?
Three strategies work well together. First, choose large-format tile for the walls — fewer grout lines means less grout surface area to maintain. Second, use an epoxy grout (Mapei Kerapoxy, Laticrete SpectraLOCK) rather than cement-based grout. Epoxy grout is non-porous, stain-resistant, and does not require sealing. It costs more and requires a more experienced installer, but the lifetime maintenance reduction is significant. Third, use a squeegee on the walls after every shower — this simple habit dramatically reduces soap scum buildup and extends the time between deep cleans. If you use cement-based grout, seal it on completion and reseal annually with a penetrating silicone grout sealer.
What showerhead setup do you recommend for a primary bathroom?
For a primary bathroom with a budget in the $15,000–$25,000 range, we recommend a thermostatic valve with two outlets: a ceiling-mounted rain head (10–12 inch, from Hansgrohe, Grohe, or Riobel) and a hand shower on a slide bar. This covers 95% of daily use cases, is easy to operate, and creates the shower experience most people are aiming for. The total hardware cost for this configuration runs $1,200–$2,500 supply depending on brand and finish. If your shower is 48×60 or larger and you want a more spa-like experience, add 4–6 body jets on a third outlet from the thermostatic valve — add $1,500–$2,500 for jets plus an additional thermostatic port.
Do I need a permit to convert a tub to a walk-in shower in Vancouver?
In the City of Vancouver: a plumbing permit is required if you are relocating the drain, and an electrical permit is required if you are adding a new circuit (for steam, in-floor heat, or other electrical additions). A building permit is generally not required for a like-for-like conversion where drain locations don’t change and walls aren’t moved. In a strata, you may also need written approval from your strata council regardless of whether a municipal permit is required. We handle permit acquisition as part of every project scope where permits apply — ask your contractor to confirm this upfront.
How long does a walk-in shower renovation take?
A standard tub-to-shower conversion in a primary bathroom takes 2–3 weeks from demo to final inspection. The timeline breaks down roughly as follows: demolition (1–2 days), plumbing rough-in (1–2 days), electrical rough-in if needed (1 day), substrate and waterproofing (2–3 days including cure time), tile installation (3–5 days depending on tile size and complexity), glass templating and fabrication (3–4 weeks lead time — order early), fixture installation (1 day), and final touch-up (1 day). The glass lead time is often the critical path — get the glass templated as soon as the tile is set and don’t wait for everything else to be finished first.
What design features make a walk-in shower aging-in-place ready?
Six features make the most meaningful difference: (1) Curbless (zero-threshold) entry — eliminates the step-over that becomes a trip hazard with age. (2) Minimum 42×42 inch shower size — allows for a shower chair or fold-down bench without feeling cramped. (3) Hand shower on a slide bar — essential for seated bathing. (4) Grab bars — blocking (reinforced backing) should be installed in the walls at the time of construction, even if the grab bars themselves are added later. Two locations are standard: near the entry/exit point and on the wall nearest the showerhead. (5) Anti-slip floor tile — R11 or higher rating. (6) Lever-style or thermostatic valve — easier to operate than round knobs, and thermostatic valves eliminate the risk of scalding. None of these features looks clinical in a contemporary shower design — they simply make the shower more functional for everyone.
What are the most common mistakes in walk-in shower installations?
In our experience, the five most common and costly installation mistakes are: (1) Inadequate waterproofing — using standard drywall instead of cement board, applying liquid membrane too thinly, or skipping the flood test on curbless installations. (2) Insufficient floor slope — a curbless shower floor that doesn’t drain completely leaves standing water and accelerates grout deterioration. (3) Ordering glass too early — glass templated before tile is set will not fit correctly if the tile work adds appreciable thickness. Always template after tile. (4) Undersizing the shower — cost pressure leads to a 36×36 shower that the homeowner wishes were larger the first time they use it. (5) Skipping the niche blocking — deciding to add a niche after the framing and waterproofing are done requires opening the wall again. Plan niche locations before framing inspection.
What tile do you recommend for small Vancouver bathrooms to make the space feel larger?
Large-format tile in a light colour, run continuously from the shower walls to the bathroom floor. This is the single most effective technique for making a small bathroom read as larger — the visual continuity of the same tile across both surfaces eliminates the busy boundary that makes small rooms feel more confined. A 24×48 inch light grey or white porcelain tile running vertically on the shower walls and horizontally on the bathroom floor (or at 45 degrees for visual interest) with a minimal grout joint (1/16 inch) is a proven approach. If budget allows, extend the same tile to the bathroom wall behind the vanity. The result is a bathroom that reads as cohesive, larger, and considerably more expensive than it was to build.
How do I choose between a linear drain and a centre drain for a curbless shower?
For most curbless shower designs in Vancouver, we recommend a linear drain. The advantages are significant: floor slope runs in a single direction (toward the drain wall) rather than four ways toward a centre point, which means large-format tile can be laid without the visible pitch and lippage that a centre-drain curbless installation often produces. Linear drains are also visually cleaner — a single strip of tile rather than a centre grate — and easier to clean. The trade-off is cost ($300–$900 for a quality linear drain vs. $80–$200 for a standard centre drain) and the requirement that the supply plumbing connects to the drain from the correct direction. For tile 12×12 or smaller, a centre drain with a four-way slope is perfectly functional. For anything larger, linear drain is the right choice.
Can a walk-in shower increase my home’s resale value in Vancouver?
Yes, consistently. In the Vancouver resale market, an updated primary bathroom is one of the top three renovation investments homeowners can make for resale return. A walk-in shower in a primary bathroom is the single most impactful feature within that bathroom renovation. The return on investment varies by neighbourhood and price tier, but it is broadly accepted in the local real estate community that a well-executed primary bathroom renovation — anchored by a curbless walk-in shower with quality tile and frameless glass — returns 70–90% of its cost in increased sale price, in addition to the quality-of-life benefit enjoyed during ownership. Homes with soaker tubs and no separate walk-in shower now show as visually dated compared to comparable listings that have done the conversion.
How do I find a reliable walk-in shower contractor in Vancouver?
Look for a licensed general contractor (BC Homeowner Protection Office registry) or a licensed tile contractor with verifiable references from completed walk-in shower or bathroom renovation projects in Vancouver. Ask specifically about their waterproofing system, whether they will pull permits for applicable work, and whether they carry liability insurance and WorkSafe BC coverage. Request a written quote that itemizes labour and materials separately and includes a project timeline. Be cautious of quotes that are significantly lower than the ranges in this article — in the Vancouver market, a dramatically low quote usually reflects cut corners in waterproofing, unlicensed subtrades, or materials that don’t meet BC code requirements. Contact Vancouver General Contractors for a free in-home consultation and detailed quote for your walk-in shower project.
Get a Free Renovation Quote
Metro Vancouver’s trusted general contractors. Free consultations across Vancouver, Burnaby, Richmond, North Shore & beyond.
Get Your Free Quote →Ready to start your project? Vancouver General Contractors (VGC) provides free, fixed-price quotes for homeowners across Metro Vancouver. Learn more about our bathroom renovation Vancouver services or request a free quote today.
VGC serves Vancouver and surrounding areas. View all renovation services in Vancouver →
Comments are closed