




Post-Renovation Walkthrough Checklist for Final Sign-Off
Final sign-off should be more than a last look around. A post-renovation walkthrough checklist helps you compare completed work with your agreement, test renovated features, record anything incomplete, and collect the documents you’ll need after the project closes. Use the walkthrough to make concerns clear before treating the work as complete.
It’s natural to focus on how the renovated space looks, but a thorough sign-off also checks how it works and what records you’re taking away. Warranties, manuals, permits, receipts, and the final invoice help you understand the work completed and maintain new features.
This guide explains what to inspect, how to document and raise concerns, and which electrical, gas, and plumbing checks deserve attention. It also covers building a clear punch list, arranging follow-up work, and collecting project documents before sign-off, so you can close the renovation with a useful record of the finished space.
Key Takeaways
- Compare finished surfaces and features with the agreed scope, and note any incomplete work before sign-off.
- Record concerns clearly with photos and agree on how and when outstanding items will be addressed.
- Give electrical, gas, and plumbing work careful attention, especially where a fault could create a safety risk.
- Gather warranty information, manuals, permits, receipts, and the final invoice so you have a useful record of the renovation.
Check cleanup, debris, dust, and damage to existing areas
Start with a room-by-room visual check before furniture or storage hides surfaces. Look for construction debris, paint splashes, dust, and damage to areas that weren’t part of the renovation. Inspect countertops by sight and touch for gouges, deep scratches, or other noticeable defects. Check custom cabinetry, appliances, trim, and nearby finishes for marks or residue.
Inspect walls, floors, ceilings, doors, and windows in good lighting. Look for uneven paint coverage or visible damage, then check floors for scratches, debris, and raised tile edges. Open and close doors and windows to confirm they move smoothly and fit their frames without obstruction.
After work ends, wait at least 24 hours before deep cleaning so airborne dust can settle. Work from high surfaces to low ones, and dry-clean before wet-cleaning; otherwise, construction dust can become sticky. Vacuum surfaces, including floors, before wiping, and use a HEPA-filter vacuum for lingering fine dust.
- Living areas: Dust ceilings, walls, trim, shelves, and light fixtures before cleaning floors.
- Kitchen: Wipe counters, cabinet fronts, appliance exteriors, and backsplash tiles; check for residue or scratches.
- Bathroom: Vacuum or dust surfaces before wet-cleaning, then clean fixtures, counters, and floors.
- Windows: Remove dust from sills and tracks, clean glass, and test each window’s operation.
Vacuum each surface twice and wet-mop hard floors twice, changing the water when it turns grey. Professional post-construction cleaning costs depend on the home’s size, the amount of dust and debris, and the work included; request a quote based on those details. A kitchen or bathroom with tiling and drywall may need two to three days for careful cleaning.
An independent home inspector isn’t automatically necessary for every renovation. Consider one if you want a separate visual review or have concerns about the finished work. Keep your walkthrough focused on cleanliness, visible damage, and whether renovated features operate as expected.
Raising concerns with the contractor during the walkthrough
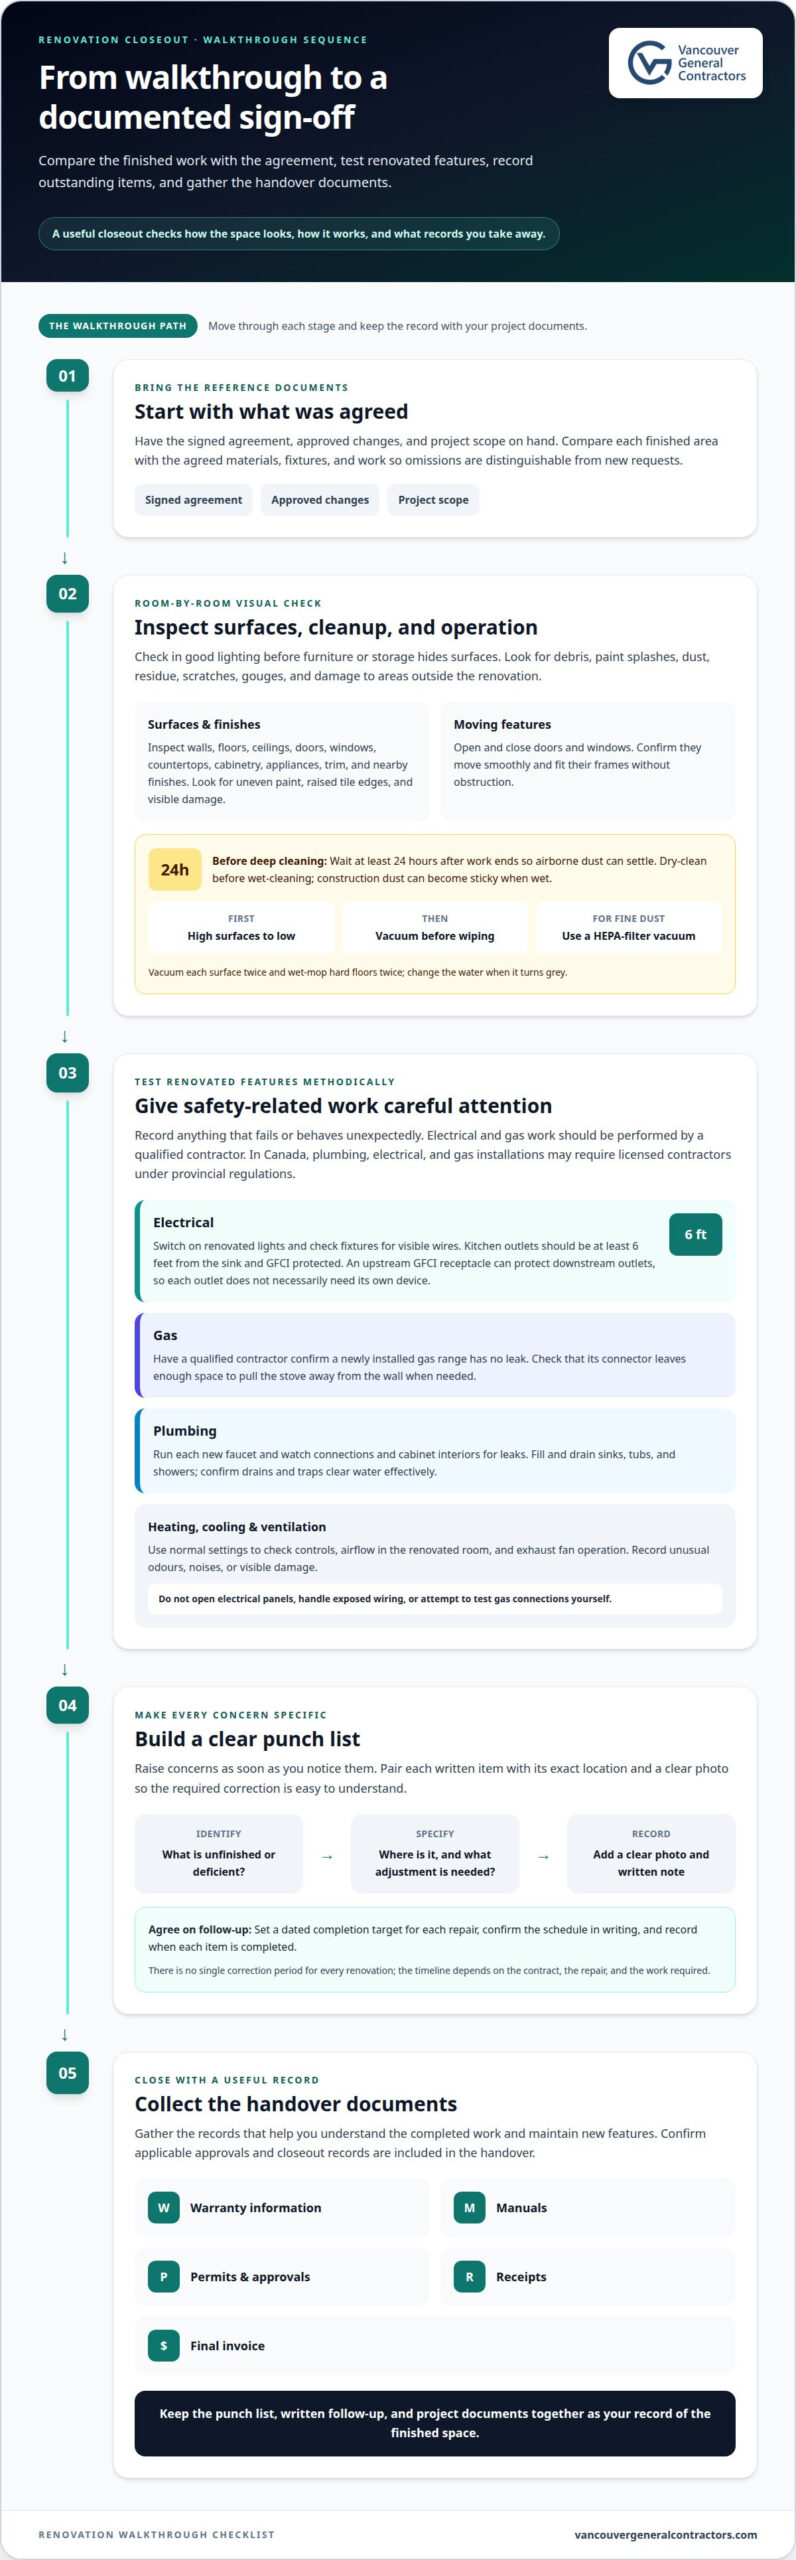
Bring the signed agreement, approved changes, and project scope to the walkthrough. Compare each finished area with those documents, including materials, fixtures, and agreed work. If a kitchen cabinet door rubs against an appliance or a bathroom finish is incomplete, identify the exact location and correction needed.
Raise concerns as soon as you notice them. Take clear photos, describe each issue plainly, and record it on a punch list with the project lead or supervisor. Note what remains unfinished, what adjustment is needed, and whether another visit is required. Confirm the follow-up schedule in writing, then record when each item is completed.
- Check the scope: Match visible work to the contract and approved changes, so omissions are distinguishable from new requests.
- Record deficiencies: Pair each written item with a location and photo, making the required correction clear.
- Agree on follow-up: Set a dated target for each repair and confirm completion in writing.
There’s no single correction period for every renovation. The timeline depends on the contract, the repair, and the work required. Record a dated completion target for each deficiency, confirm it with the contractor, and keep the written record with your project documents.
Contractor qualifications and permits also matter during project closeout. In Canada, plumbing, electrical, and gas installations may require licensed contractors under provincial regulations. Work involving electricity or gas usually requires permits. Confirm that applicable approvals and closeout records are included in the handover.
Clarify debris removal against the agreed scope. Note remaining packaging, offcuts, or construction waste, and record who will remove it and when. For future work, clear renovation project planning can set expectations for scope, cleanup, and handover from the start.
Safety considerations for electrical, gas, and plumbing work
Test renovated systems methodically during the walkthrough, and record anything that fails or behaves unexpectedly. Work involving electricity or gas should be performed by a qualified contractor, as incorrectly completed work can create safety hazards. In Canada, plumbing, electrical, and gas installations may require licensed contractors under provincial regulations.
- Electrical: Switch on renovated lights and check that fixtures work without visible wires. Kitchen outlets should be at least 6 feet from the sink and GFCI protected. An upstream GFCI receptacle can protect downstream outlets, so each outlet doesn’t necessarily need its own device.
- Gas: Have the qualified contractor confirm that a newly installed gas range has no leak. Check that its connector leaves enough space to pull the stove away from the wall when needed.
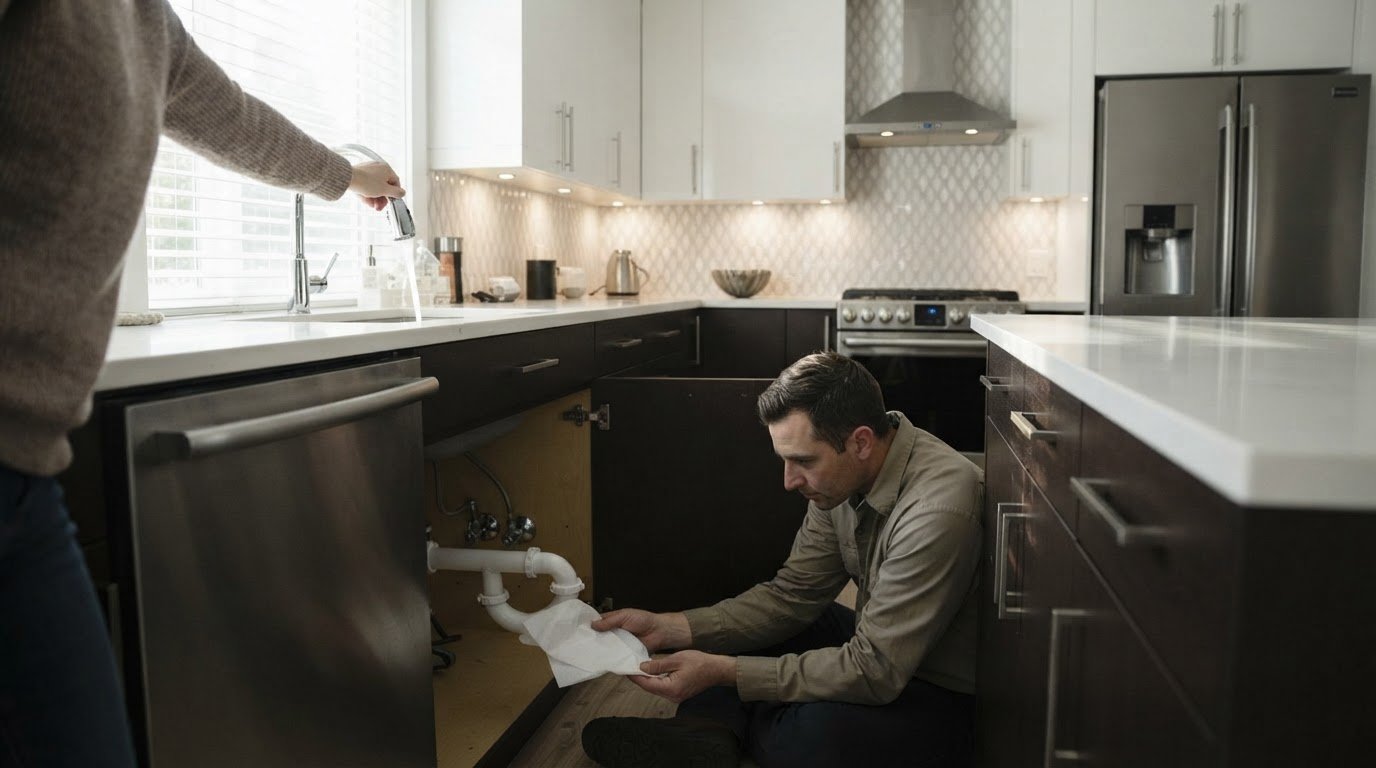
- Plumbing: Run each new faucet, then watch the connections and cabinet interiors for leaks. Fill and drain sinks, tubs, and showers; confirm drains and traps clear water effectively.
In the bathroom, remove dust from surfaces around fixtures, cabinets, and the backsplash before wet cleaning. Construction dust can become sticky when wet, so vacuum or dry-dust first. Then clean and disinfect frequently touched surfaces, such as faucet handles and switches, following the product label.
Check heating, cooling, and ventilation controls using their normal settings. Confirm that the renovated room receives airflow and exhaust fans operate. Record unusual odours, noises, or visible damage for the contractor. Don’t open electrical panels, handle exposed wiring, or attempt to test gas connections yourself.
Keep checks within the home renovation scope: test only systems and fixtures affected by the work, and record the room and issue clearly. For a kitchen renovation, for example, operate new lights, check sink drainage, and have the gas range connection assessed. Ask a qualified contractor to address safety concerns and document any required follow-up before final sign-off.
Request warranties, manuals, permits, receipts, and final invoices
Closeout paperwork gives homeowners a practical record of the work and its care requirements. Request written warranty documents for installed products and workmanship, plus confirmation that any required warranty registration is complete. Find out where digital copies are stored, then keep them with the final invoice and approved project changes.
Collect manuals for new appliances, fixtures, windows, and other equipment. During handover, ask for a demonstration of unfamiliar controls and maintenance steps, such as cleaning a ventilation filter or adjusting a drawer. Take notes, and record a demonstration for later reference if useful. Warranty coverage may depend on proper use and maintenance, so follow the manufacturer’s instructions.
- Permits: Request copies of permits and closeout records for work that required them. Permits are usually needed for work involving electricity or gas service.
- Receipts: Keep receipts for cleanup supplies, equipment rentals, and disposal fees as records of project-related expenses.
- Final invoice: Ask for an itemized account of completed work, approved changes, payments received, and any remaining balance.
- Warranty file: Store registration details, coverage documents, manuals, and maintenance instructions together.
Make final payment after the walkthrough is complete and agreed deficiencies are documented. For residential renovations in Canada, don’t assume one nationwide holdback release date applies to every project. Review the payment and holdback terms in your contract, and get the release conditions in writing before releasing funds.
Warranty coverage and claim steps depend on the written terms for the work or product. Keep dated records of concerns and completed repairs, and follow maintenance instructions; neglect or improper use can affect coverage. A thorough home improvement handover leaves you with documents you can find, understand, and use.
Planning a renovation? Discuss your renovation project and the records needed for a clear closeout.
Warranty coverage and claim steps depend on the written terms for the work or product, and neglect or improper use can affect coverage. There is no single nationwide holdback release date for every residential renovation, so review the contract and get the release conditions in writing before releasing funds.
Vancouver General Contractors
Vancouver General Contractors helps homeowners plan renovations with a coordinated design-build process, from initial concept and 3D design through construction and permits. If you’re planning a substantial renovation and want clear scope, organized project delivery, and a considered handover, this process can connect decisions made early with the finished work. It applies to projects such as whole-home, condo, and kitchen renovations, as well as home additions. A defined scope and consistent project coordination can also make it easier to review completed work and record any outstanding items during the final walkthrough.
For a renovation planned around lasting function and finish, contact Vancouver General Contractors.
Carry your renovation forward with confidence
A post-renovation walkthrough checklist can also inform your next project by helping you identify what matters most in the spaces you want to improve. Think beyond individual finishes: consider how the layout, storage, and everyday routines should work together, then bring those priorities into early planning.
Vancouver General Contractors manages renovation projects through a design-build process, from initial concept and 3D design to construction and permits. Its work includes home additions, whole-home renovations, and condo renovations. A clear discussion of your goals and project scope can help shape a renovation around your home and how you use it.
Ready to explore what your home could become? Contact Vancouver General Contractors to discuss your renovation plans. Thoughtful planning today can help create a space that serves you well for years to come.
Frequently Asked Questions
What Is a Post-Renovation Inspection?
A post-renovation inspection is a final review of completed work with the project lead or supervisor. It checks whether the result aligns with the agreed scope and works as intended. For example, note whether a newly installed closet door closes properly and its trim is finished. The review helps distinguish completed work from items that still need attention.
Is deep cleaning necessary after renovation?
Yes, deep cleaning helps remove fine construction dust that can settle in less obvious places. Check window tracks, the tops of door frames, vents, and edges behind appliances. Dust can also collect on newly finished surfaces, so use cleaning methods suited to each material. A careful clean prepares renovated rooms for regular use and helps prevent residue from being overlooked.
What Is a Renovation Punch List?
A renovation punch list is a shared working record of unfinished tasks, adjustments, or deficiencies identified before closeout. Make each entry specific: name the room, describe the issue, and note the expected correction. For instance, “hall closet door catches at the top” is clearer than “fix door.” Track whether each item is open or complete, and keep the updated list with project records.
What Should Be Included in the Walkthrough?
Review agreed work, finishes, doors, windows, and renovated features that need to operate. Check easy-to-miss areas, such as closet interiors, trim edges, and storage spaces. Also discuss access devices, controls, and other handover details needed to use the finished space. Tie each observation to a specific room so follow-up is clear.
What should a post-renovation walkthrough checklist include?
Organize the checklist by room, then give each item a simple result: complete, needs attention, or not applicable. Add the location and a short description for anything requiring follow-up. Include finish quality, operation, visible damage, cleanup, and handover details. This format helps you move through the property systematically and see which rooms still have open items.
How do you test plumbing, electrical, heating, ventilation, and appliances after renovation?
Operate each affected feature using its normal controls: run taps, check drainage, switch lights, adjust the thermostat, and test ventilation controls. Run new appliances according to their manuals, noting error messages, unusual sounds, or poor operation. Look for water around plumbing connections. Leave suspected electrical or gas faults to a qualified contractor rather than attempting repairs yourself.
More Uncategorized Guides





Comments are closed